
XPC 是 Apple 提供的现代化“进程级函数调用机制”,用于在不同进程之间像调用本地方法一样交换数据和执行任务。
XPC 可以将后台任务从主应用中分离出来,运行在独立的进程中,提高系统的整体稳定性。
使用场景
例如,一个普通的图片压缩 App,App 的任务:显示UI、读取、解码、压缩以及写入文件。
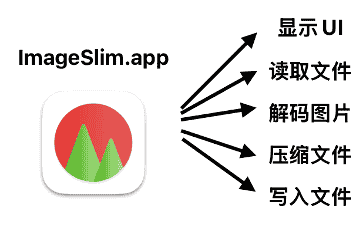
在运行App的过程中,可能会存在主线程任务导致UI卡顿甚至崩溃的风险。
XPC将 App和任务分离,App主要用于显示UI进程,App.xpc 独立运行后台服务进程中,实现读取、解码、压缩以及写入文件等操作。
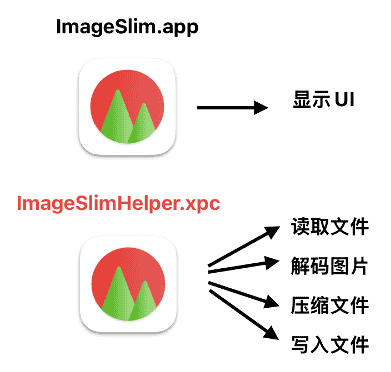
App 不再是调用函数,而是请求另一个进程帮忙执行函数。
XPC = 进程级RPC(远程函数调用),由 Mach 消息、自动序列化、生命周期托管等技术组成。
因为XPC将UI进程和后台任务进行分离,当调用函数发生崩溃时,UI不会受到影响,两者不同地址空间,权限隔离,内存安全。当发生问题时,XPC只会杀死helper,不会杀死UI。
实现步骤
1、创建XPC Service
在Xcode菜单栏中找到File → New → Target → XPC Service。

2、定义通信协议
创建一个共享的协议文件,定义服务接口:
// XPCServiceProtocol.h
#import <Foundation/Foundation.h>

@protocol XPCServiceProtocol

- (void)performCalculation:(NSInteger)value
                withReply:(void (^)(NSInteger result))reply;

- (void)processData:(NSString *)data
         completion:(void (^)(NSString *result, NSError *error))completion;

@end
3、实现 XPC Service
// XPCServiceDelegate.m
#import "XPCServiceDelegate.h"
#import "XPCServiceProtocol.h"

@interface XPCServiceDelegate () <NSXPCListenerDelegate, XPCServiceProtocol>
@end

@implementation XPCServiceDelegate

- (BOOL)listener:(NSXPCListener *)listener
shouldAcceptNewConnection:(NSXPCConnection *)newConnection {

    // 设置导出的接口
    newConnection.exportedInterface = [NSXPCInterface interfaceWithProtocol:@protocol(XPCServiceProtocol)];
    newConnection.exportedObject = self;

    // 处理连接中断
    newConnection.interruptionHandler = ^{
        NSLog(@"Connection interrupted");
    };

    newConnection.invalidationHandler = ^{
        NSLog(@"Connection invalidated");
    };

    [newConnection resume];
    return YES;
}

#pragma mark - XPCServiceProtocol

- (void)performCalculation:(NSInteger)value
                withReply:(void (^)(NSInteger))reply {
    // 执行计算
    NSInteger result = value * 2;
    reply(result);
}

- (void)processData:(NSString *)data
         completion:(void (^)(NSString *, NSError *))completion {
    // 处理数据
    NSString *processed = [data uppercaseString];
    completion(processed, nil);
}

@end
4、主 App 中使用 XPC Service
// ViewController.m
#import "ViewController.h"
#import "XPCServiceProtocol.h"

@interface ViewController ()
@property (strong) NSXPCConnection *connection;
@end

@implementation ViewController

- (void)viewDidLoad {
    [super viewDidLoad];
    [self setupXPCConnection];
}

- (void)setupXPCConnection {
    // 创建连接
    self.connection = [[NSXPCConnection alloc] initWithServiceName:@"com.yourcompany.XPCService"];

    // 设置远程对象接口
    self.connection.remoteObjectInterface = [NSXPCInterface interfaceWithProtocol:@protocol(XPCServiceProtocol)];

    // 处理连接中断
    self.connection.interruptionHandler = ^{
        NSLog(@"Connection interrupted");
    };

    self.connection.invalidationHandler = ^{
        NSLog(@"Connection invalidated");
    };

    [self.connection resume];
}

- (void)callXPCService {
    // 获取远程对象代理
    id<XPCServiceProtocol> service = [self.connection remoteObjectProxyWithErrorHandler:^(NSError *error) {
        NSLog(@"Remote proxy error: %@", error);
    }];

    // 调用服务方法
    [service performCalculation:42 withReply:^(NSInteger result) {
        NSLog(@"Result: %ld", (long)result);
    }];

    [service processData:@"hello world" completion:^(NSString *result, NSError *error) {
        if (error) {
            NSLog(@"Error: %@", error);
        } else {
            NSLog(@"Processed: %@", result);
        }
    }];
}

- (void)dealloc {
    [self.connection invalidate];
}

@end
5、Swift实现示例
// XPCServiceProtocol.swift
import Foundation

@objc protocol XPCServiceProtocol {
    func performCalculation(_ value: Int, withReply reply: @escaping (Int) -> Void)
    func processData(_ data: String, completion: @escaping (String?, Error?) -> Void)
}

// 主应用中使用
class ViewController: NSViewController {
    var connection: NSXPCConnection?

    override func viewDidLoad() {
        super.viewDidLoad()
        setupXPCConnection()
    }

    func setupXPCConnection() {
        connection = NSXPCConnection(serviceName: "com.yourcompany.XPCService")
        connection?.remoteObjectInterface = NSXPCInterface(with: XPCServiceProtocol.self)

        connection?.interruptionHandler = {
            print("Connection interrupted")
        }

        connection?.invalidationHandler = {
            print("Connection invalidated")
        }

        connection?.resume()
    }

    func callXPCService() {
        guard let service = connection?.remoteObjectProxyWithErrorHandler({ error in
            print("Remote proxy error: \(error)")
        }) as? XPCServiceProtocol else {
            return
        }

        service.performCalculation(42) { result in
            print("Result: \(result)")
        }
    }

    deinit {
        connection?.invalidate()
    }
}
XPC Service的Info.plist需要配置:
<key>XPCService</key>
<dict>
    <key>ServiceType</key>
    <string>Application</string>
</dict>
常见的 ServiceType:
1、Application:应用级服务。
2、System:系统级服务(需要特殊权限)。
主要特点
1、安全性:XPC 采用沙盒机制,服务运行在独立的进程中,即使服务崩溃也不会影响主应用程序。这种隔离性提高了系统的整体稳定性和安全性。
2、权限分离:可以将需要特殊权限的操作放在独立的 XPC 服务中,主应用只需要最小权限,符合最小权限原则。
3、异步通信:XPC 使用基于块(block)的异步 API,避免阻塞主线程。
4、对象序列化:支持传输多种数据类型,包括字典、数组、字符串、数据、文件描述符等。
注意事项
1、始终使用 remoteObjectProxyWithErrorHandler: 而不是 remoteObjectProxy。
2、及时调用 invalidate 释放连接。
3、XPC 回调可能在非主线程,注意 UI 更新要回到主线程。
4、传输自定义对象需要实现 NSSecureCoding。
5、保持对 NSXPCConnection 的强引用,避免过早释放。
总结
当需要调用C/C++等不稳定库、需要执行大量CPU任务、希望UI不会被阻塞,可以考虑使用XPC框架。
把高风险、高耗时、有权限要求的代码从 UI 进程中剥离,形成独立可控的系统托管服务进程。