
ScreenCaptureKit 是 Apple 在 macOS 13(Ventura)及以上系统中引入的高性能屏幕捕捉框架,用于采集屏幕内容(窗口、显示器、应用),适用于开发录屏、远程桌面、虚拟摄像头、游戏直播等应用。
相比传统的 CGDisplayStream 和 AVCaptureScreenInput,ScreenCaptureKit 更现代、更高效、更灵活。
基本特性
1、高性能:使用 Metal 加速的帧处理,适合高帧率场景(如游戏录制);
2、低延迟:实时传输屏幕图像(适合直播或投屏);
3、精细选择:可精确选择捕捉全部屏幕、单个窗口、多个窗口、单个应用的所有窗口;
4、隐私安全:支持 macOS 系统的权限机制(如录屏权限);
5、支持窗口透明度:可选是否保留窗口的圆角、阴影、透明效果;
6、支持 Metal 和 SwiftUI:捕获的图像可直接传入 Metal 或 SwiftUI 图层中渲染。
基本用法
import ScreenCaptureKit

// 1. 创建内容过滤器(要捕获什么)
let filter = SCContentFilter(
    display: SCDisplay,              // SCDisplay实例
    excludingApplications: [], // 可排除 App
    exceptingWindows: []       // 可排除窗口
)

// 2. 配置捕获参数
let config = SCStreamConfiguration()
config.showsCursor = true
config.capturesAudio = false
config.minimumFrameInterval = CMTime(value: 1, timescale: 60) // 60 FPS

// 3. 创建捕获流
let stream = try await SCStream(filter: filter, configuration: config, delegate: yourDelegate)
try stream.addStreamOutput(output, type: .screen, sampleHandlerQueue: .main)
try await stream.startCapture()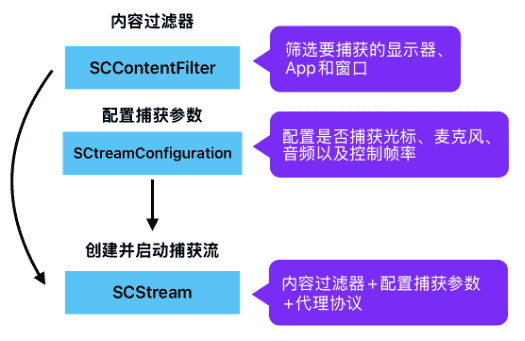
代码解析
1、创建内容过滤器:SCContentFilter
let filter = SCContentFilter(
    display: SCDisplay,	//
    excludingApplications: [],
    exceptingWindows: []
)
1、display: SCDisplay
需要传入一个 SCDisplay 对象,指定某个屏幕。
可以通过SCShareableContent获取全部显示器(主显示器 + 外接显示器):
let content = try? await SCShareableContent.excludingDesktopWindows(false, onScreenWindowsOnly: true)
guard let displays = content?.displays else { return } // [SCDisplay]
for display in displays {
    print("display:\(display)") // display:<SCDisplay: 0x600001dc5180>
}
将返回的SCDisplay对象传入display参数。
2、excludingApplications: []
用于指定不想被捕获的 App,可以排除防止录自己。
类型为 [SCApplication],代表一组应用。
可以通过 SCShareableContent 获取系统中正在运行的可捕获应用:
let apps = content.applications // [SCApplication]常见用途是排除自己这个应用,避免录到自己的浮窗等内容:
let myApp = content.applications.first { $0.bundleIdentifier == Bundle.main.bundleIdentifier }3、exceptingWindows: []
排除特定窗口的显示内容,例如隐私敏感窗口或不想录制的弹窗。
类型为 [SCWindow],可用于过滤掉某些不希望录入的特定窗口。
可通过 SCShareableContent 获取系统所有可捕获窗口:
let windows = content.windows // [SCWindow]2、配置捕获参数:SCStreamConfiguration
let config = SCStreamConfiguration()
config.showsCursor = true   // 录制光标
config.capturesAudio = false  // 不录制麦克风或系统音
config.minimumFrameInterval = CMTime(value: 1, timescale: 60) // 60 FPS1、showsCursor:Bool类型,是否录制光标。截图工具一般设为 true,方便展示用户操作。
2、capturesAudio:Bool类型,是否同时录制麦克风或系统音。截图工具多数设为 false。
3、minimumFrameInterval:CMTime类型,帧率控制。上面配置为 1/60 秒,即 60FPS。
4、pixelFormat (可选):OSType类型,输出的图像格式,比如 kCVPixelFormatType_32BGRA。
5、width, height (可选):Int类型,期望的输出分辨率(可以不设,自动与屏幕分辨率匹配)。
3、创建并启动捕获流:SCStream
let stream = try await SCStream(filter: filter, configuration: config, delegate: yourDelegate)
try stream.addStreamOutput(output, type: .screen, sampleHandlerQueue: .main)
try await stream.startCapture()1、SCStream:表示一个屏幕捕获流。
2、filter:指定要捕获哪些内容(屏幕、窗口、应用排除)。
3、configuration:帧率、是否录光标等设置。
4、delegate:必须实现 SCStreamDelegate 协议,用于响应流状态变化和错误处理。
delegate 采用的是协议 SCStreamDelegate,目前该协议只有一个方法:
protocol SCStreamDelegate: AnyObject {
    func stream(_ stream: SCStream, didStopWithError error: Error)
}
用于监听流是否因错误而停止。
delegate示例:
var streamDelegate: MyStreamDelegate?

class MyStreamDelegate: NSObject, SCStreamDelegate {
    func stream(_ stream: SCStream, didStopWithError error: Error) {
        print("捕获流停止,原因:\(error.localizedDescription)")
    }
}

let myDelegate = MyStreamDelegate()
streamDelegate = myDelegate      // 保留引用

let stream = try await SCStream(filter: filter, configuration: config, delegate: myDelegate)
注意:在实际应用
5、addStreamOutput(…)
stream.addStreamOutput(output, type: .screen, sampleHandlerQueue: .main)1)output:需遵守 SCStreamOutput 协议的对象,接收图像帧(CMSampleBuffer)。
output采用的是协议 SCStreamDelegate,目前该协议也只有一个方法:
public protocol SCStreamOutput : NSObjectProtocol {
    optional func stream(_ stream: SCStream, didOutputSampleBuffer sampleBuffer: CMSampleBuffer, of type: SCStreamOutputType)
}
在这个方法中处理捕获到的视频帧或音频帧,比如渲染、保存成图片、录制成视频等。
output示例:
var streamOutput: MyStreamOutput?

class MyStreamDelegate: NSObject, SCStreamDelegate {
    func stream(_ stream: SCStream, didStopWithError error: Error) {
        print("捕获流停止,原因:\(error.localizedDescription)")
    }
}

let output = MyStreamOutput()
streamOutput = output      // 保留引用

try? stream?.addStreamOutput(output, type: .screen, sampleHandlerQueue: .main)
获取屏幕帧后,可以将它编码为 MP4 或写入文件,通常需要用 AVAssetWriter 去编码保存:
// 创建 AVAssetWriter + AVAssetWriterInput
// 在 didOutputSampleBuffer 中逐帧写入
2)type:指定要捕获的数据类型,有两个可选值(SCStreamOutputType):
.screen:捕获屏幕图像(视频帧)数据,主要用于录屏或图像处理;
.audio:捕获音频数据(系统声音或麦克风);
使用 .audio 时需要配置 SCStreamConfiguration 的音频相关参数,否则不会有音频输出。
3)sampleHandlerQueue:SCStream 异步回调的队列,通常用于处理输出的数据(图像帧、音频帧)。
.main:回调在主线程(UI 操作时使用);
DispatchQueue(label: “my.queue”):自定义并发或串行队列,推荐用于后台处理,如图像编码或写入磁盘等。
6、startCapture()
try await stream.startCapture()用于启动屏幕捕获过程,一次捕获中只能调用一次,重复调用需先 .stopCapture()。
应用场景
1、macOS 屏幕录像 App(高帧率);
2、桌面直播工具(OBS、Twitch 客户端等);
3、屏幕协同工具(远程演示、协同办公);
4、开发虚拟摄像头驱动(将桌面作为摄像源);
5、更高质量截图工具(实时显示窗口动态)。
注意事项
1、ScreenCaptureKit需要macOS 13 Ventura 及以上;
2、屏幕录制权限(Screen Recording),用户必须在系统设置中开启。
3、ScreenCaptureKit没有保存路径,需要在实现SCStreamOutput协议的类中获取CMSampleBuffer(视频帧),编码为 MP4 或写入文件保存。
4、在实际使用中,需要保留SCStream示例,当需要结束录制的时候,调用:
try await stream.stopCapture()示例:
var stream: SCStream?

func stopRecording() async {
    do {
        try await stream?.stopCapture()
        print("录制已停止")
    } catch {
        print("停止录制出错:\(error)")
    }
}
5、Delegate和Output协议的对象,在实际应用中不能保存为局部变量,当当 Task 块执行完毕之后,它们会立即释放销毁(即便 stream 还在运行中),导致 SCStream 在回调中访问已释放的 delegate/output,从而触发 EXC_BAD_ACCESS。
应该将它们保存为全局变量,保证它们的生命周期与 stream 一致。
var stream: SCStream?
var streamDelegate: MyStreamDelegate?
var streamOutput: MyStreamOutput?

Task {
    let myDelegate = MyStreamDelegate()
    let output = MyStreamOutput()
    streamDelegate = myDelegate      // 保留引用
    streamOutput = output   // 保留引用

    stream = SCStream(filter: filter, configuration: config, delegate: myDelegate)
    try? stream?.addStreamOutput(output, type: .screen, sampleHandlerQueue: .main)
    try? await stream?.startCapture()
}
总结
ScreenCaptureKit 是 Apple 为 macOS 提供的最现代、最高效的屏幕捕捉框架,适合新一代截图、录屏、直播类 App 的开发。
如果在使用SCStream的过程中,发生EXC_BAD_ACCESS崩溃,可能是因为某些对象的生命周期或线程访问不安全,违反了 ScreenCaptureKit 的线程要求。
SCStream 及其相关的 API(如 addStreamOutput, startCapture, stopCapture)必须在主线程上调用,并且对象本身也应在主线程创建、使用、销毁。解决方案为,使用Task包裹async调用:
Task { @MainActor in
    try await ...
}
或者使用@MainAcotr修饰方法
@MainActor
@objc func screenshot() {
    // 代码
}
在实际调用时,应用会在状态栏显示录屏图标:
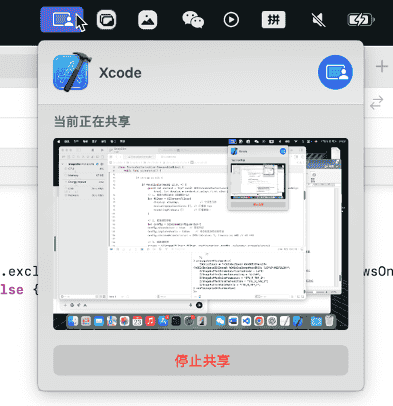
Xcode输出屏幕帧数据:
获取到屏幕帧数据:<CVPixelBuffer 0x600000c6f8e0 width=1920 height=1080 pixelFormat=420v iosurface=0x600003f48370 surfaceid=82 planes=2>
<Plane 0 width=1920 height=1080 bytesPerRow=1920>
<Plane 1 width=960 height=540 bytesPerRow=1920>
<attributes={
    ExtendedPixelsBottom = 0;
    ExtendedPixelsLeft = 0;
    ExtendedPixelsRight = 0;
    ExtendedPixelsTop = 0;
    PixelFormatDescription =     {
        BitsPerComponent = 8;
        ComponentRange = VideoRange;
        ContainsAlpha = 0;
        ContainsGrayscale = 0;
        ContainsRGB = 0;
        ContainsYCbCr = 1;
        FillExtendedPixelsCallback = {length = 24, bytes = 0x0000000000000000a0c6f18f010000000000000000000000};
        IOSurfaceCoreAnimationCompatibility = 1;
        PixelFormat = 875704438;
        Planes =         (
                        {
                BitsPerBlock = 8;
                BlackBlock = {length = 1, bytes = 0x10};
            },
                        {
                BitsPerBlock = 16;
                BlackBlock = {length = 2, bytes = 0x8080};
                HorizontalSubsampling = 2;
                VerticalSubsampling = 2;
            }
        );
    };
} propagatedAttachments={
    CGColorSpace = "<CGColorSpace 0x60000194ca20> (kCGColorSpaceICCBased; kCGColorSpaceModelRGB; \U5f69\U8272LCD)";
    CVImageBufferChromaLocationTopField = Left;
    CVImageBufferChromaSubsampling = "4:2:0";
    CVImageBufferColorPrimaries = "ITU_R_709_2";
    CVImageBufferTransferFunction = "ITU_R_709_2";
    CVImageBufferYCbCrMatrix = "ITU_R_709_2";
} nonPropagatedAttachments={
}>
相关文章
1、ScreenCaptureKit:https://developer.apple.com/documentation/screencapturekit
2、macOS可捕获内容SCShareableContent:https://fangjunyu.com/2025/07/23/macos%e5%8f%af%e6%8d%95%e8%8e%b7%e5%86%85%e5%ae%b9scshareablecontent/