
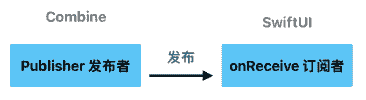
在 SwiftUI 中,.onReceive(_:_:) 是一个用于响应 Combine 发布者(Publisher)事件的视图修饰器(modifier)。
基本定义
func onReceive<P: Publisher>(
  _ publisher: P,
  perform action: @escaping (P.Output) -> Void
) -> some View
publisher:要订阅的 Combine 发布者(如 Timer.publish()、PassthroughSubject 等);
action:当发布者发出事件时执行的闭包;
返回值:一个新的 View(符合 SwiftUI 声明式风格);
使用示例
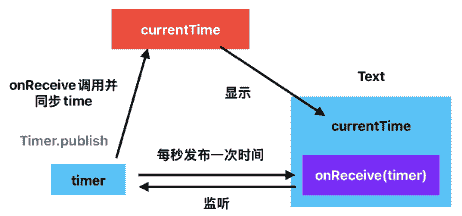
1、响应定时器事件
struct TimerView: View {
    @State private var currentTime = Date()

    let timer = Timer.publish(every: 1, on: .main, in: .common).autoconnect()

    var body: some View {
        Text("当前时间:\(currentTime.formatted())")
            .onReceive(timer) { time in
                currentTime = time
            }
    }
}
使用 .onReceive(timer) 来接收定时器每秒发出的时间,自动更新 UI。
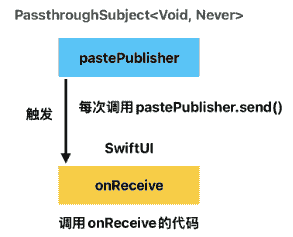
2、响应自定义PassthroughSubject
let pastePublisher = PassthroughSubject<Void, Never>()

.onReceive(pastePublisher) {
    // 每次调用 pastePublisher.send(),都会触发这里
}每次调用pastePublisher.send()方法,onReceive都会触发并调用相关代码。相关案例请见《macOS用户输入事件NSEvent》的SwiftUI使用NSEvent监听剪贴板示例部分。
常用场景
1、定时器:Timer.publish(…);
2、自定义事件:PassthroughSubject;
3、网络请求响应:URLSession.shared.dataTaskPublisher;
4、状态共享:@ObservedObject.objectWillChange;
5、系统通知桥接:NotificationCenter.Publisher。
总结
.onReceive() 是 SwiftUI 接收 Combine 发布者事件并作出响应的桥梁。
它让你可以把响应式的事件流(如键盘、定时器、网络、粘贴)与 UI 绑定起来,从而构建声明式、自动响应的 UI。
相关文章
1、Apple处理异步任务的Combine框架:https://fangjunyu.com/2024/12/01/apple%e5%a4%84%e7%90%86%e5%bc%82%e6%ad%a5%e4%bb%bb%e5%8a%a1%e7%9a%84combine%e6%a1%86%e6%9e%b6/
2、Swift常见的支持 Publisher 响应式处理的类或场景:https://fangjunyu.com/2024/12/14/swift%e5%b8%b8%e8%a7%81%e7%9a%84%e6%94%af%e6%8c%81-publisher-%e5%93%8d%e5%ba%94%e5%bc%8f%e5%a4%84%e7%90%86%e7%9a%84%e7%b1%bb%e6%88%96%e5%9c%ba%e6%99%af/
3、Swift和Foundation框架创建和管理定时任务的Timer类:https://fangjunyu.com/2024/12/14/swift%e5%92%8cfoundation%e6%a1%86%e6%9e%b6%e5%88%9b%e5%bb%ba%e5%92%8c%e7%ae%a1%e7%90%86%e5%ae%9a%e6%97%b6%e4%bb%bb%e5%8a%a1%e7%9a%84timer%e7%b1%bb/
4、macOS用户输入事件NSEvent:https://fangjunyu.com/2025/07/04/macos%e7%94%a8%e6%88%b7%e8%be%93%e5%85%a5%e4%ba%8b%e4%bb%b6nsevent/
5、macOS用户输入事件NSEvent :https://fangjunyu.com/2025/07/04/macos%e7%94%a8%e6%88%b7%e8%be%93%e5%85%a5%e4%ba%8b%e4%bb%b6nsevent/