
在iOS中,如果想要使用Swift解压缩ZIP文件,下面是常用的几种解压缩方法。
常用方法
1、使用 Compression 框架(内建于 macOS 和 iOS)
Compression 框架是 macOS 和 iOS 系统内建的一个压缩库,它支持 GZIP、LZMA、BZIP2、Zlib 和其他压缩格式。但是,它并没有直接提供解压 ZIP 文件的功能。因此,使用该框架来解压 ZIP 文件会比较复杂,通常需要手动处理文件的压缩和解压。
然而,如果想要处理常见的压缩格式(比如 GZIP),可以使用这个框架。对于 ZIP 文件来说,Compression 并不直接支持,所以一般推荐使用其他方法。
2、使用 FileManager 和 Process 执行 unzip 命令
如果不想使用第三方库,也可以使用 macOS 或 iOS 上的系统工具 unzip 命令(需要终端支持)来解压 ZIP 文件。可以通过 Process 来调用系统的 unzip 命令。
示例代码:
import Foundation

func unzipWithProcess(zipFilePath: String, destinationPath: String) {
    let task = Process()
    task.launchPath = "/usr/bin/unzip"  // macOS 上的 unzip 工具路径
    task.arguments = [zipFilePath, "-d", destinationPath]  // -d 用于指定目标文件夹

    task.launch()
    task.waitUntilExit()

    if task.terminationStatus == 0 {
        print("解压成功")
    } else {
        print("解压失败")
    }
}注意:这种方法依赖于系统提供的 unzip 命令,通常适用于 macOS。如果在 iOS 中使用,iOS 设备默认是没有这个工具的,因此不推荐在 iOS 上使用此方法。
3、使用 Zip 库(轻量级第三方库)
如果希望使用一个更轻量的第三方库来解压 ZIP 文件,但不想使用 SSZipArchive,可以考虑使用 Zip 库。它是一个简单且易于使用的库,专门用于处理 ZIP 文件。
安装 Zip 库
如果使用 CocoaPods,可以在 Podfile 中添加:
pod 'Zip'如果使用 Swift Package Manager,可以在 Xcode 中添加以下依赖:
.package(url: "https://github.com/marmelroy/Zip.git", from: "2.0.0")示例代码:
import Zip

func unzipWithZipLibrary(zipFilePath: String, destinationPath: String) {
    do {
        // 解压到指定目录
        let zipURL = URL(fileURLWithPath: zipFilePath)
        let destinationURL = URL(fileURLWithPath: destinationPath)

        try Zip.unzipFile(zipURL, destination: destinationURL, overwrite: true, password: nil)
        print("解压成功")
    } catch {
        print("解压失败: \(error)")
    }
}
Zip 库非常易于使用,并且提供了支持密码保护的解压功能。它是处理 ZIP 文件的一个非常轻量级且简洁的库,适合在不需要过多功能的情况下使用。
4、使用 CoreFoundation 的 CFURL 和 CFFTP(低级别方法)
在某些情况下,可能会想要手动实现解压 ZIP 文件的功能,而不是依赖第三方库。在这种情况下,可能需要深入到文件流操作中,使用 CoreFoundation 或其他底层 API 进行解压。
然而,这种方法通常较为复杂,不建议在没有实际需求的情况下使用。
5、使用ZIPFoundation库
ZIP Foundation 是一个用于创建、读取和修改 ZIP 存档文件的库。它用 Swift 编写,基于Apple 的 libcompression,具有高性能和能效。
它允许使用一行代码压缩和解压文件和目录:
// 压缩文件
try fileManager.zipItem(at: sourceURL, to: destinationURL)

// 解压缩文件
try fileManager.unzipItem(at: sourceURL, to: destinationURL)根据stackoverflow文章中的高赞回答,本文使用ZIP Foundation库解压ZIP文件。但在实际的测试发现,下面代码:
try fileManager.unzipItem(at: sourceURL, to: destinationURL)在使用unzipItem代码时,Xcode提示:
'unzipItem' is inaccessible due to 'internal' protection level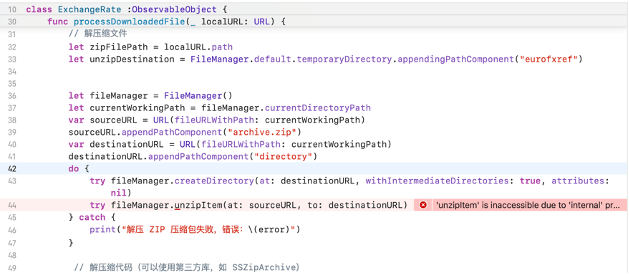
因此没有使用这一方案,但可以作为参考。
使用Zip库解压ZIP文件
1、配置ZIP库
下面是使用Zip库,解压ZIP文件的流程:

首先,打开Xcode项目,点击左侧顶部的项目名称,在PROJECT中找到“Package Dependencies”软件包依赖项。

在软件包依赖项页面中,右上角找到输入框,输入下面的Git仓库地址:
https://github.com/marmelroy/Zip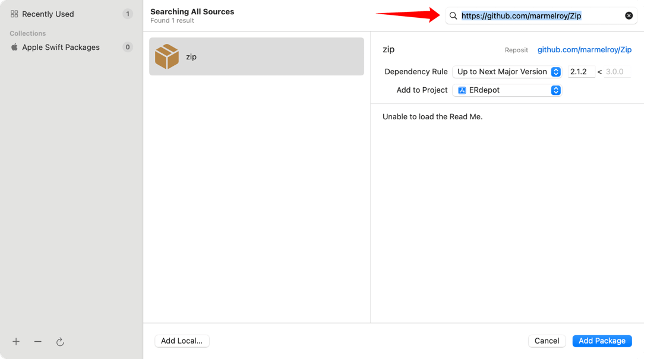
点击“Add Package”按钮。
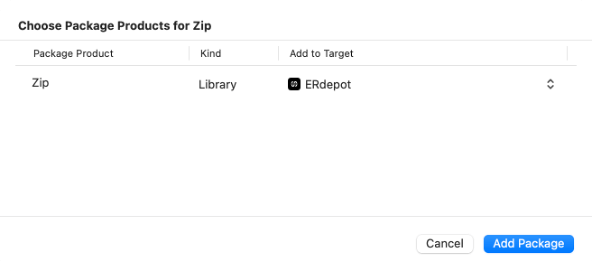
选择对应的项目,点击“Add Package”按钮。
2、使用ZIP库
首先在Swift文件顶部导入 ZIP。
import Zip快捷功能
使用 Zip 的最简单方法是通过快捷函数。两者都将本地文件路径作为 NSURL,如果遇到错误则抛出,如果成功则返回到目标的 NSURL。
do {
    let filePath = Bundle.main.url(forResource: "file", withExtension: "zip")!
    let unzipDirectory = try Zip.quickUnzipFile(filePath) // Unzip
    let zipFilePath = try Zip.quickZipFiles([filePath], fileName: "archive") // Zip
}
catch {
  print("Something went wrong")
}
filePath是ZIP压缩文件,需要注意的是,在使用ZIP的过程中,解压文件的后缀必须是 .zip,默认的解压文件路径在Document文件夹。
如果是使用URLSession.shared.downloadTask下载的文件,默认为.tmp后缀,使用ZIP解压时,就会报错。
高级Zip
对于更高级的用法,Zip 具有一些函数,设置自定义目标路径、使用受密码保护的 zip 文件以及使用进度处理闭包。如果出现错误,这些函数会抛出错误,但不返回。
do {
    let filePath = Bundle.main.url(forResource: "file", withExtension: "zip")!
    let documentsDirectory = FileManager.default.urls(for:.documentDirectory, in: .userDomainMask)[0]
    try Zip.unzipFile(filePath, destination: documentsDirectory, overwrite: true, password: "password", progress: { (progress) -> () in
        print(progress)
    }) // Unzip

    let zipFilePath = documentsFolder.appendingPathComponent("archive.zip")
    try Zip.zipFiles([filePath], zipFilePath: zipFilePath, password: "password", progress: { (progress) -> () in
        print(progress)
    }) //Zip

}
catch {
  print("Something went wrong")
}
上面是高级的Zip用法,以解压为例,使用Zip.unzipFile解压文件:
try Zip.unzipFile(filePath, destination: documentsDirectory, overwrite: true, password: "password", progress: { (progress) -> () in
    print(progress)
}) // Unzip
filePath为Zip文件的路径,destination为需要解压的路径,overwrite表示是否覆盖已存在的同名文件,password表示压缩包的解压密码,progress为跟踪解压进度。
也可以不使用progress设置解压进度:
try Zip.unzipFile(destinationURL, destination: destinationDirectory, overwrite: true, password: "")完成解压ZIP文件的工作。
自定义压缩ZIP
// 获取压缩的文件夹路径:Downloads
let downloadsDirectory = FileManager.default.urls(for:.downloadsDirectory, in: .userDomainMask)[0]
// 设置压缩的文件路径:Downloads/ImageSlim.zip
let destinationURL = downloadsDirectory.appendingPathComponent("ImageSlim.zip")
// 将所有需要压缩的文件路径放到一个数组中
var ImagesURL:[URL] {
    let urls = appStorage.images.compactMap { $0.outputURL }
    return urls
}
// 压缩文件,paths为压缩文件的路径,zipFilePath为压缩文件保存的位置,password为秘密,progress为压缩进度
try Zip.zipFiles(paths: ImagesURL, zipFilePath: destinationURL, password: nil) { progress in }
调用该方法后,可以将ImagesURL中的所有文件打包,并下载到Downloads文件夹下。
3、实际示例
下面是通过实际的应用场景,使用ZIP库实现整个解压ZIP文件的操作。
首先导入 ZIP 库。
import Zip使用URLSession.shared.downloadTask下载ZIP文件:
func downloadExchangeRates() {
    print("进入下载方法 downloadExchangeRates")
    let task = URLSession.shared.downloadTask(with: fileURL) { localURL, response, error in
        if let error = error {
            print("下载失败: \(error)")
            return
        }
        if let localURL = localURL,let response = response,let suggestedFilename = response.suggestedFilename {
            // 保存到永久路径
            let fileManager = FileManager.default
            let destinationURL = fileManager.temporaryDirectory.appendingPathComponent(suggestedFilename)

            // 移动下载的文件到临时文件夹
            do {
                try fileManager.moveItem(at: localURL, to: destinationURL)
                print("文件已保存到:\(destinationURL)")

                // 下载完成后解压文件并处理
                self.processDownloadedFile(destinationURL)
            } catch {
                print("移动文件时出错:\(error)")
            }
        } else {
            print("在解包localURL、response的过程中出错了。")
        }

    }
    task.resume()   // 启动下载任务
}当下载文件后,默认是tmp文件(这部分知识可以查看《Swift 管理文件的Filemanager类》文章底部的扩展知识进行学习了解)。
ZIP库无法直接解压tmp文件,如果尝试解压tmp文件,下面的代码就会报错:
Error during zipping: unzipFail // print("Error during zipping: \(error)")因此,需要自定义下载的ZIP文件名称,或者使用suggestedFilename设置下载的ZIP文件名称:
print("\(suggestedFilename)") // eurofxref-hist.zip并且将下载的ZIP文件移动到临时目录。
下面是解压ZIP文件。
func processDownloadedFile(_ destinationURL: URL) {
    do {
        print("进入processDownloadedFile方法")

        // 选择临时目录作为解压目标
        var destinationDirectory = FileManager.default.temporaryDirectory
        try Zip.unzipFile(destinationURL, destination: destinationDirectory, overwrite: true, password: "")

        let files = try FileManager.default.contentsOfDirectory(at: destinationDirectory, includingPropertiesForKeys: nil)
        print("临时文件的列表为:")
        // 打印文件列表
        for file in files {
            print(file.lastPathComponent) // 打印文件名
        }
    } catch {
        print("Error during zipping: \(error)")
    }
}
使用try Zip.unzipFile进行解压:
try Zip.unzipFile(destinationURL, destination: destinationDirectory, overwrite: true, password: "")解压后,使用FileManager的contentsOfDirectory方法,检查解压文件所在目录的文件列表。
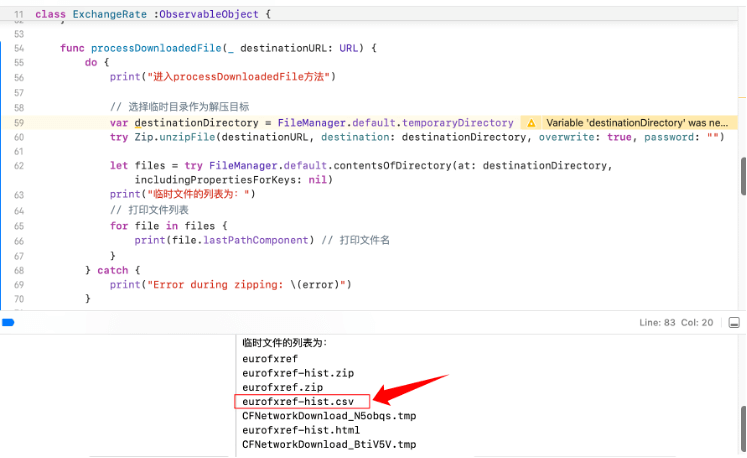
最后,可以看到解压出来的文件。
总结
使用Zip库解压ZIP文件时,需要注意的几点:
1、解压的文件必须是 .zip 后缀,其他后缀的文件都会解压失败,即使是URLSession.shared.downloadTask下载的 .tmp 文件也不行。
2、可以使用快捷方法进行压缩/解压文件:
let unzipDirectory = try Zip.quickUnzipFile(filePath) // Unzip但是,快捷方法压缩/解压的文件因为没有指定位置,默认存储在Document文件夹。
虽然在常用方法中罗列了5种方法,但目前只有Zip库实现解压,其他的方法并没有做过测试,因此其他的方法在解压的过程中,可能会跟ZIPFoundation库一样存在一些报错问题,需要查询其他的教程进一步学习。
最后,还有非常重要的一点,当我使用快捷方法时发现,在解压单一文件的Zip压缩包时,可能会出现解压文件夹的情况。意思是,在解压文件后,会解压出对应的文件夹,虽然文件夹里只有一个文件。
而使用高级Zip方法时,解压单一文件的Zip只会解压出单一文件,没有解压出压缩包。所以,这种解压文件和解压文件夹的情况,在实际的操作中也需要特别注意。
相关文章
1、Decompress a zip file with Swift:https://stackoverflow.com/questions/38202769/decompress-a-zip-file-with-swift
2、SOLVED: How can I unzip a file:https://www.hackingwithswift.com/forums/swiftui/how-can-i-unzip-a-file/27108
3、ZIPFoundation:https://github.com/weichsel/ZIPFoundation
4、Zip:https://github.com/marmelroy/Zip
5、Swift 管理文件的Filemanager类:https://fangjunyu.com/2024/11/03/swift-%e7%ae%a1%e7%90%86%e6%96%87%e4%bb%b6%e7%9a%84filemanager%e7%b1%bb/