在 SwiftUI 中,stroke 和 strokeBorder 都用于为形状绘制边框,但它们的行为略有不同,主要区别在于边框的位置以及对形状尺寸的影响。以下是详细对比和应用场景的说明:
1、stroke
语法
stroke(_ content: ShapeStyle, lineWidth: CGFloat) -> some View特点
1)边框绘制位置:
stroke 的边框绘制在形状的边界线上,因此边框宽度会同时向内和向外扩展。
例如,如果线宽为 10,边框的宽度会在边界内外各占 5。
2)适用场景:
不需要严格控制边框在形状内部时。
比如普通装饰性边框、较大的形状。
2、strokeBorder
语法
strokeBorder(_ content: ShapeStyle, lineWidth: CGFloat) -> some View特点
1)边框绘制位置:
strokeBorder 的边框完全绘制在形状的边界内部,不会向外扩展。
例如,如果线宽为 10,整个宽度都在形状内部。
2)适用场景:
当需要严格控制形状的外部尺寸时(比如按钮或复杂 UI 布局)。
边框宽度影响视图布局时,推荐使用 strokeBorder。

对比示例
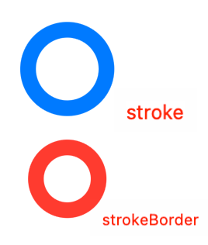
以下代码展示了 stroke 和 strokeBorder 的差异:
struct StrokeVsStrokeBorderExample: View {
    var body: some View {
        VStack(spacing: 40) {
            // 使用 stroke
            Circle()
                .stroke(Color.blue, lineWidth: 20)
                .frame(width: 100, height: 100) // 总直径会增加到 120

            // 使用 strokeBorder
            Circle()
                .strokeBorder(Color.red, lineWidth: 20)
                .frame(width: 100, height: 100) // 总直径保持 100
        }
    }
}
效果分析
stroke:边框宽度向内外扩展,导致形状整体变大,总直径为 120。
strokeBorder:边框宽度只在内部,外部尺寸保持不变,总直径为 100。
渐变和自定义效果
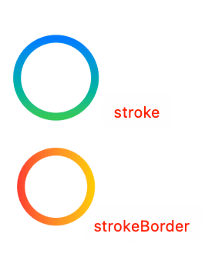
两者都可以支持颜色、渐变和自定义形状样式。
渐变边框
struct GradientStrokeExample: View {
    var body: some View {
        VStack(spacing: 40) {
            // stroke
            Circle()
                .stroke(
                    LinearGradient(colors: [.blue, .green], startPoint: .top, endPoint: .bottom),
                    lineWidth: 10
                )
                .frame(width: 100, height: 100)

            // strokeBorder
            Circle()
                .strokeBorder(
                    LinearGradient(colors: [.red, .yellow], startPoint: .leading, endPoint: .trailing),
                    lineWidth: 10
                )
                .frame(width: 100, height: 100)
        }
    }
}
完整示例:结合背景和边框
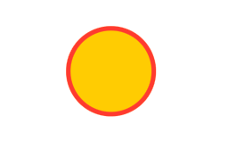
如果需要同时填充形状并绘制边框,推荐使用 strokeBorder:
struct CombinedExample: View {
    var body: some View {
        Circle()
            .fill(Color.yellow) // 填充圆形
            .overlay(
                Circle()
                    .strokeBorder(Color.red, lineWidth: 5) // 绘制内部边框
            )
            .frame(width: 100, height: 100)
    }
}
效果:
内部填充为黄色。
红色边框宽度为 5,完全绘制在圆形的内部。
总结
stroke:边框会均匀扩展,适用于无需严格控制布局的场景。
strokeBorder:边框完全在形状内部,适用于需要精确控制外部尺寸的场景。
二者在功能上类似,但应用场景有细微区别,视需求选择合适的 API。
如果想要给VStack或HStack等视图添加边框线,可以使用 .overlay 和 .clipShape 来为 HStack 添加边框线:
HStack {
    // HStack 中的内容
}
.frame(width: 300, height: 60)
.background(Color.white) // 可选:设置背景色
.cornerRadius(10) // 设置圆角
.overlay(
    RoundedRectangle(cornerRadius: 10)
        .stroke(Color.gray, lineWidth: 2) // 设置边框颜色和宽度
)


