在 Swift 中,UserNotifications 框架用于管理和调度本地通知或远程通知(推送通知)。这是 iOS 开发中非常重要的功能,用于向用户发送提醒或与他们保持互动。
基本概念
本地通知:应用程序在设备上创建并触发的通知。例如,提醒用户完成某项任务。
远程通知:通过 Apple 的 APNs(Apple Push Notification Service)从服务器发送到用户设备的通知。
UserNotifications 框架统一了本地和远程通知的处理。
使用步骤
1、导入 UserNotifications 框架
在需要的文件中添加:
import UserNotifications2、请求用户授权
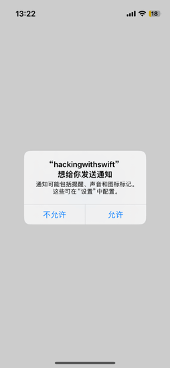
用户需要授予应用程序发送通知的权限。以下代码请求通知权限:
func requestNotificationPermission() {
    let center = UNUserNotificationCenter.current()
    center.requestAuthorization(options: [.alert, .sound, .badge]) { granted, error in
        if let error = error {
            print("授权失败:\(error.localizedDescription)")
        } else {
            print("授权结果:\(granted ? "允许" : "拒绝")")
        }
    }
}
3、调度本地通知
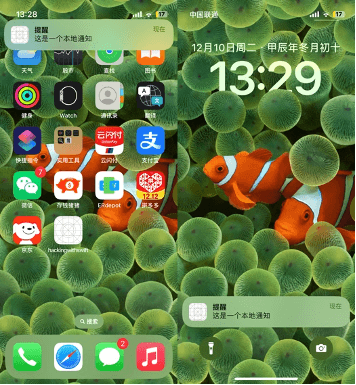
使用 UNNotificationRequest 和 UNNotificationTrigger 来调度本地通知:
func scheduleLocalNotification() {
    let content = UNMutableNotificationContent()
    content.title = "提醒"
    content.body = "这是一个本地通知"
    content.sound = .default

    // 创建触发条件,例如 5 秒后触发
    let trigger = UNTimeIntervalNotificationTrigger(timeInterval: 5, repeats: false)

    // 创建通知请求
    let request = UNNotificationRequest(identifier: UUID().uuidString, content: content, trigger: trigger)

    // 将通知添加到通知中心
    UNUserNotificationCenter.current().add(request) { error in
        if let error = error {
            print("通知调度失败:\(error.localizedDescription)")
        } else {
            print("通知调度成功")
        }
    }
}
4、处理通知
如果希望在应用运行时处理通知,可以实现 UNUserNotificationCenterDelegate:
class NotificationManager: NSObject, UNUserNotificationCenterDelegate {
    func userNotificationCenter(_ center: UNUserNotificationCenter, willPresent notification: UNNotification, withCompletionHandler completionHandler: @escaping (UNNotificationPresentationOptions) -> Void) {
        // 应用在前台时,通知的处理方式
        completionHandler([.alert, .sound, .badge])
    }

    func userNotificationCenter(_ center: UNUserNotificationCenter, didReceive response: UNNotificationResponse, withCompletionHandler completionHandler: @escaping () -> Void) {
        // 用户点击通知后的处理
        print("用户点击了通知:\(response.notification.request.content.title)")
        completionHandler()
    }
}
然后将这个类设置为通知中心的代理:
UNUserNotificationCenter.current().delegate = NotificationManager()完整示例
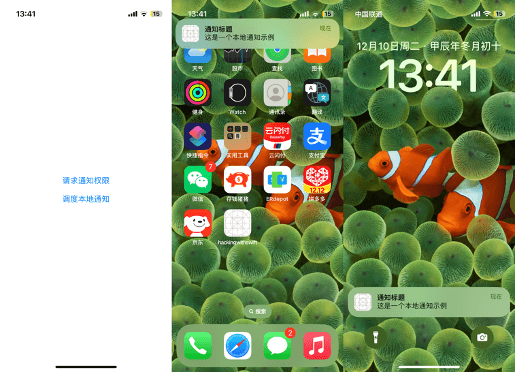
以下是一个完整的示例,展示了如何请求权限、调度通知以及处理通知:
import SwiftUI
import UserNotifications

struct ContentView: View {
    var body: some View {
        VStack(spacing: 20) {
            Button("请求通知权限") {
                requestNotificationPermission()
            }

            Button("调度本地通知") {
                scheduleLocalNotification()
            }
        }
        .padding()
    }

    func requestNotificationPermission() {
        let center = UNUserNotificationCenter.current()
        center.requestAuthorization(options: [.alert, .sound, .badge]) { granted, error in
            if let error = error {
                print("授权失败:\(error.localizedDescription)")
            } else {
                print("授权结果:\(granted ? "允许" : "拒绝")")
            }
        }
        UNUserNotificationCenter.current().delegate = NotificationManager()
    }

    func scheduleLocalNotification() {
        let content = UNMutableNotificationContent()
        content.title = "通知标题"
        content.body = "这是一个本地通知示例"
        content.sound = .default

        let trigger = UNTimeIntervalNotificationTrigger(timeInterval: 10, repeats: false)

        let request = UNNotificationRequest(identifier: UUID().uuidString, content: content, trigger: trigger)

        UNUserNotificationCenter.current().add(request) { error in
            if let error = error {
                print("通知调度失败:\(error.localizedDescription)")
            } else {
                print("通知已调度")
            }
        }
    }
}

class NotificationManager: NSObject, UNUserNotificationCenterDelegate {
    func userNotificationCenter(_ center: UNUserNotificationCenter, willPresent notification: UNNotification, withCompletionHandler completionHandler: @escaping (UNNotificationPresentationOptions) -> Void) {
        completionHandler([.alert, .sound, .badge])
    }

    func userNotificationCenter(_ center: UNUserNotificationCenter, didReceive response: UNNotificationResponse, withCompletionHandler completionHandler: @escaping () -> Void) {
        print("通知点击:\(response.notification.request.content.body)")
        completionHandler()
    }
}

#Preview {
    ContentView()
}
清除通知
在 UserNotifications 框架中,可以通过以下方式清除已经设定的某个通知:
清除某个未触发的通知
如果要清除一个已经计划但尚未触发的本地通知,可以使用 UNUserNotificationCenter 的 removePendingNotificationRequests(withIdentifiers:) 方法。
代码示例:
let identifierToRemove = "specific-notification-id"

// 从通知中心移除计划的通知
UNUserNotificationCenter.current().removePendingNotificationRequests(withIdentifiers: [identifierToRemove])

print("未触发的通知已清除")注意:
identifierToRemove 是在创建通知请求时设置的 UNNotificationRequest 的 identifier。
如果不记得标识符,可以用 UNUserNotificationCenter.current().getPendingNotificationRequests() 获取所有待触发通知的请求列表,找到目标通知的标识符。
清除某个已经触发的通知
如果通知已经触发并显示在通知中心,可以使用 UNUserNotificationCenter 的 removeDeliveredNotifications(withIdentifiers:) 方法来清除。
代码示例:
let identifierToRemove = "specific-notification-id"

// 从通知中心移除已触发的通知
UNUserNotificationCenter.current().removeDeliveredNotifications(withIdentifiers: [identifierToRemove])

print("已触发的通知已清除")
清除所有通知
如果需要清除所有通知(包括待触发和已触发的),可以使用以下方法:
清除所有未触发的通知:
UNUserNotificationCenter.current().removeAllPendingNotificationRequests()

print("所有未触发的通知已清除")
清除所有已触发的通知:
UNUserNotificationCenter.current().removeAllDeliveredNotifications()

print("所有已触发的通知已清除")
获取通知信息
在清除之前,可以查看当前通知的具体信息:
获取所有待触发的通知请求:
UNUserNotificationCenter.current().getPendingNotificationRequests { requests in
    for request in requests {
        print("待触发通知:\(request.identifier)")
    }
}
获取所有已触发的通知:
UNUserNotificationCenter.current().getDeliveredNotifications { notifications in
    for notification in notifications {
        print("已触发通知:\(notification.request.identifier)")
    }
}
通过这些方法,可以灵活地管理应用中的通知,按需清除。
总结
1、权限管理
如果用户拒绝通知权限,应用无法再次请求,必须引导用户去设置中手动开启。
2、通知触发器
1)UNTimeIntervalNotificationTrigger:基于时间间隔。
// 创建时间间隔触发器
let trigger = UNTimeIntervalNotificationTrigger(timeInterval: 5, repeats: false)注意事项:
timeInterval 必须大于或等于 1 秒。
如果 repeats 为 true,时间间隔必须大于或等于 60 秒。
2)UNCalendarNotificationTrigger:基于日期和时间。
// 创建日期和时间组件
var dateComponents = DateComponents()
dateComponents.hour = 10
dateComponents.minute = 30

// 创建日期触发器
let trigger = UNCalendarNotificationTrigger(dateMatching: dateComponents, repeats: true)注意事项:
dateMatching 参数接受 DateComponents,可以指定年、月、日、时、分等。
如果 repeats 为 true,触发器会在指定的时间循环触发。
3)UNLocationNotificationTrigger:基于地理位置。
// 定义地理位置
let center = CLLocationCoordinate2D(latitude: 37.334900, longitude: -122.009020) // 示例坐标
let region = CLCircularRegion(center: center, radius: 500, identifier: "Apple Park")
region.notifyOnEntry = true // 当用户进入区域时触发
region.notifyOnExit = false // 不触发离开区域的通知

// 创建位置触发器
let trigger = UNLocationNotificationTrigger(region: region, repeats: true)注意事项:
需要在应用中请求位置权限(NSLocationWhenInUseUsageDescription 或 NSLocationAlwaysUsageDescription)。
受系统电量优化影响,位置通知可能不会立即触发。
3、后台通知
如果需要应用在后台或被关闭时接收通知,必须使用远程通知。
4、调试通知
使用 Xcode 的模拟器调试通知可能会受到限制,建议在真实设备上测试。
UserNotifications 框架功能强大,可用于各种复杂的通知需求,例如丰富的内容、动态交互等。
相关问题
本地通知在后台或关闭状态下激活的原因
本地通知的触发行为与系统的通知机制有关。即使应用未运行,通知的调度和显示由 iOS 系统 控制,而不是应用本身。调度通知的核心工作由 UNNotificationRequest 和 UNNotificationTrigger 提交给系统后,系统会在适当的时间触发。
这意味着:
应用不需要在前台运行来触发本地通知。
iOS 保证了调度的通知按时显示(例如在设置的时间或满足条件时触发)。
可以添加很多通知调度吗?
是的,可以同时调度许多通知,但有一些限制和注意事项:
1、系统限制:
iOS 对同一应用可以调度的本地通知数量有一定限制,通常是 64 个活动通知。如果超过这个数量,较早的通知可能会被移除。
2、批量调度:
如果需要调度大量通知,可以一次性添加多个 UNNotificationRequest:
for i in 1...10 {
    let content = UNMutableNotificationContent()
    content.title = "通知 \(i)"
    content.body = "这是第 \(i) 个通知"
    let trigger = UNTimeIntervalNotificationTrigger(timeInterval: TimeInterval(i * 60), repeats: false)
    let request = UNNotificationRequest(identifier: "通知\(i)", content: content, trigger: trigger)
    UNUserNotificationCenter.current().add(request)
}3、重复触发:
如果希望通知定期重复,可以使用 repeats: true 的触发器,例如每天早上 8 点重复的通知:
var dateComponents = DateComponents()
dateComponents.hour = 8
let trigger = UNCalendarNotificationTrigger(dateMatching: dateComponents, repeats: true)
为什么应用未运行时也能发出通知?
这是 iOS 系统的特性。通知的显示并不依赖应用的运行状态,系统会根据以下情况管理通知:
1、后台任务:
如果调度的是本地通知,它们会按计划触发,无需应用运行。
对于远程通知,APNs(Apple Push Notification Service)会将通知推送到设备,系统直接显示通知。
2、持久化调度:
调度的本地通知被存储在设备的系统中,即使应用被关闭,通知仍然会在设定时间显示。
3、远程通知(Push Notification):
如果是远程通知,通知由服务器通过 APNs 发送到设备,与应用运行状态无关。
应用需要注册远程通知权限,通过服务器触发,例如:
func application(_ application: UIApplication, didRegisterForRemoteNotificationsWithDeviceToken deviceToken: Data) {
    print("成功注册远程通知,设备令牌:\(deviceToken)")
}
应用卸载后通知是否会清除?
当应用被删除后,与应用相关的所有本地通知和推送通知都会被系统清除。
1、本地通知
通知调度清除:通过 UNNotificationRequest 调度的本地通知会被系统自动移除。
通知记录清除:所有与应用相关的通知历史(例如用户未查看的通知)也会被清除。
2、推送通知
APNs 令牌失效:应用删除后,设备的 APNs 令牌会失效。即使服务器尝试向这个设备发送推送通知,也会失败。
通知记录清除:通知中心中与该应用相关的所有推送消息也会被移除。
3、用户授权状态
用户为该应用授予的通知权限状态会被系统自动清除。如果用户重新安装该应用,必须再次请求通知权限。
4、数据清除的原理
iOS 系统严格隔离每个应用的沙盒环境,当应用被删除时:
1、应用的沙盒目录会被完全移除,包括与通知调度相关的数据。
2、系统会清除所有与该应用的标识符(Bundle Identifier)关联的通知记录。
注意事项
1、本地通知限制:
本地通知由设备本身管理,过多通知可能影响用户体验。建议合理调度,确保每个通知都有意义。
2、远程通知需要网络支持:
应用在后台甚至被关闭时仍然可以接收远程通知,但设备必须连接网络。
3、后台执行任务:
某些应用在后台可以完成额外任务,例如通过后台任务调度(BackgroundTasks)保持更新,这样可以触发更加复杂的通知逻辑。
优化策略
使用合理的触发器,例如特定时间(UNCalendarNotificationTrigger)或条件(UNLocationNotificationTrigger)。
避免重复无用的通知,确保用户体验。
对于需要实时更新的数据,结合远程通知或后台任务调度实现更优的通知管理。
如果应用未运行时发出通知,很可能是通过远程通知实现的。结合本地通知和远程通知可以满足大多数通知需求,同时兼顾性能和用户体验。
获取当前调度的所有未触发的通知
UNUserNotificationCenter.current().getPendingNotificationRequests() 用于获取当前调度的所有未触发的通知。通过调用它,可以查看每个通知请求的详细信息,例如标识符 (identifier)、内容 (content) 和触发条件 (trigger)。
代码示例
以下是一个完整的示例,展示如何使用 getPendingNotificationRequests 来获取并打印未触发通知的信息:
func listPendingNotifications() {
    UNUserNotificationCenter.current().getPendingNotificationRequests { requests in
        print("当前共有 \(requests.count) 个未触发的通知:")

        for request in requests {
            print("通知标识符:\(request.identifier)")
            print("通知标题:\(request.content.title)")
            print("通知内容:\(request.content.body)")

            if let trigger = request.trigger as? UNTimeIntervalNotificationTrigger {
                print("触发类型:基于时间间隔,时间间隔:\(trigger.timeInterval) 秒")
            } else if let trigger = request.trigger as? UNCalendarNotificationTrigger {
                print("触发类型:基于日期时间,日期:\(String(describing: trigger.dateComponents))")
            } else if let trigger = request.trigger as? UNLocationNotificationTrigger {
                print("触发类型:基于位置")
            }

            print("-----------------------------")
        }
    }
}
调用示例
将该方法绑定到按钮或其他触发操作,运行后会在控制台输出所有未触发通知的详细信息:
Button("查看未触发的通知") {
    listPendingNotifications()
}

