Swift 中的 Binding(即 Swift.Binding<T>)可以通过闭包创建,它提供了更加灵活和自定义的方式来连接数据源。它通常用于自定义控件、组件,或者当状态绑定需要额外的逻辑时。
Binding 的定义
Binding<T> 是一个结构体,表示一个值的可变引用。它的核心功能是通过 get 和 set 闭包来提供对数据的读写访问。
Binding 的构造
使用 Binding 的静态方法 Binding(get:set:) 来手动创建一个绑定:
Binding<T>(get: @escaping () -> T, set: @escaping (T) -> Void)get:提供获取值的方式。
set:定义如何更新值。
自定义 Binding
1、只读绑定
如果某个场景中,只需要只读的值,可以仅提供 get 闭包:
let readOnlyBinding = Binding<Int>(
    get: { 42 }, // 返回固定值
    set: { _ in } // 忽略任何设置操作
)
2、动态值调整
当想对绑定值进行逻辑处理时,可以自定义 Binding 的 get 和 set:
struct ParentView: View {
    @State private var score = 50

    var body: some View {
        VStack {
            Text("Score: \(score)")
            Slider(value: Binding(
                get: { Double(self.score) },
                set: { self.score = Int($0) }
            ), in: 0...100)
        }
    }
}get: 将 score 转为 Double,以适配 Slider。
set: 将 Slider 的值转换回 Int 更新到 score。

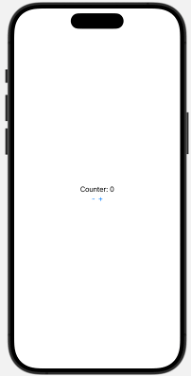
3、简单示例:在父视图和子视图之间创建绑定
struct ParentView: View {
    @State private var counter = 0

    var body: some View {
        VStack {
            Text("Counter: \(counter)")
            // 手动创建一个 Binding
            CounterControl(
                counterBinding: Binding(
                    get: { self.counter },      // 获取值
                    set: { self.counter = $0 }  // 设置值
                )
            )
        }
    }
}

struct CounterControl: View {
    var counterBinding: Binding<Int>

    var body: some View {
        HStack {
            Button("-") { counterBinding.wrappedValue -= 1 }
            Button("+") { counterBinding.wrappedValue += 1 }
        }
    }
}
代码运行过程
1、初始化时:
父视图 ContentView 初始化,counter 的初始值是 0。
手动创建了一个 Binding,将 counter 传递到子视图。
2、用户点击按钮时:
点击 + 按钮,counterBinding.wrappedValue += 1。
wrappedValue 实际上指向 ContentView.counter,所以会增加父视图的 counter。
由于 counter 是 @State,它的值改变后会触发 ContentView 重绘,Text(“Counter: \(counter)”) 会显示新的值。
3、状态同步:
子视图和父视图通过 Binding 同步,确保二者实时共享状态。
Binding 的属性
1、wrappedValue:通过此属性访问绑定的当前值或更新值。
对于 Binding<T>,wrappedValue 提供对绑定值的直接读写。
@State private var count = 0

var body: some View {
    VStack {
        Text("Count: \(count)")
        Button("Increment") {
            $count.wrappedValue += 1 // 等同于 count += 1
        }
    }
}
wrappedValue 的作用就是直接操作 count 的值。
读取:$count.wrappedValue 返回当前 count 的值。
写入:通过 wrappedValue 设置新的值。
2、projectedValue:返回自身,用于将绑定传递给另一个视图。
返回属性包装器本身,常常以 $ 前缀形式出现。
对于 Binding,projectedValue 提供了对绑定实例的引用,用于将绑定传递给子视图或其他组件。
@State private var count = 0

var body: some View {
    VStack {
        Text("Count: \(count)")
        CounterView(count: $count) // 传递 Binding<Int> 实例
    }
}
struct CounterView: View {
    @Binding var count: Int

    var body: some View {
        Button("Increment") {
            count += 1 // 直接使用绑定的值
        }
    }
}
在 ParentView 中,$count 是 projectedValue,表示对绑定对象的引用。
在 CounterView 中,@Binding 自动解析绑定的 wrappedValue,直接操作 count。
Binding 的类型声明
Binding 的类型声明是否需要显式指定取决于 Swift 的类型推断能力。如果 Swift 能根据上下文自动推断出 Binding 的泛型类型,则可以省略显式的类型标注 <T>。
为什么有的 Binding 需要显式声明 <Int>?
1、类型无法从上下文推断
如果 Binding 是独立的,或者类型不能从上下文推断时,需要显式指定 <T>,例如:
let readOnlyBinding = Binding<Int>(
    get: { 42 }, // 返回固定值
    set: { _ in } // 忽略任何设置操作
)
Swift 无法从 get 和 set 推断 Binding 的泛型类型。
明确声明 <Int> 告诉 Swift 这是一个绑定到 Int 值的 Binding。
2、无上下文时强制指定类型
在无上下文的情况(如常量初始化)中,必须显式声明类型:
let binding = Binding<Int>(get: { 0 }, set: { _ in })为什么有的 Binding 不需要显式声明?
当 Binding 的上下文足够明确时,Swift 能推断出泛型类型,无需显式声明:
1、从属性类型推断
如果 Binding 的结果被传递到某个接受 Binding<T> 类型的参数中,Swift 可以推断类型。例如:
let score = 42
Binding(
    get: { Double(score) },
    set: { score = Int($0) }
)
假设这个 Binding 被传递到一个接受 Binding<Double> 的视图,Swift 自动推断类型为 Binding<Double>。
2、从状态变量推断
当 Binding 是基于已有的 @State 或 @Binding 创建时,Swift 已经知道类型:
@State private var score = 42

let binding = Binding(
    get: { Double(score) },    // 推断类型为 Double
    set: { score = Int($0) }   // 因为 set 需要 Int,这里也自动推断出 score 是 Int
)
Swift 自动知道 score 是 Int,并推断出 Binding 泛型类型。
显式声明 <T> 在类型不明确或无上下文时是必要的。
在可以从上下文推断类型的情况下,省略泛型声明使代码更简洁。
实际应用场景
自定义控件:需要与外部状态进行交互时。
动态值调整:需要在数据绑定中插入逻辑处理。
只读数据:例如显示从其他模型中计算而来的值。
通过 Binding 的灵活性,可以将视图设计得更加模块化和动态化,从而减少直接依赖全局状态。


