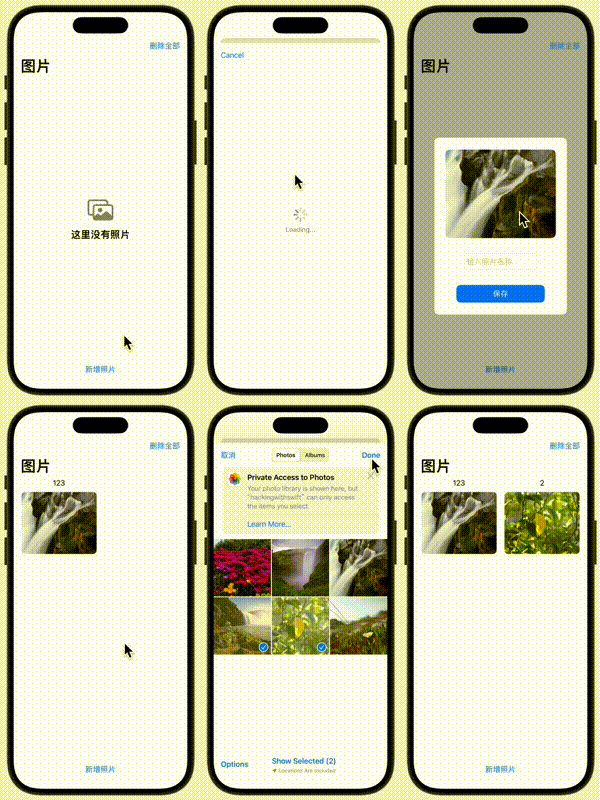
异步任务调度队列或逐步处理队列,其核心思想是将任务按顺序存储到一个队列中,逐一处理,并确保前一个任务完成后再启动下一个任务。

实际案例
在管理照片的应用中,通过PhotosPicker导入照片,并检测导入照片的行为后,立即要求用户命名照片。
PhotosPicker("新增照片", selection: $pickerItems, matching: .images)
    .onChange(of: pickerItems) { _, newItems in
        for item in newItems {
            Task {
                if let data = try? await item.loadTransferable(type: Data.self) {
                    newPhotoData = data // 暂存照片数据
                    showNamingAlert = true // 显示命名弹窗
                }
            }
        }
    }
当选取多张照片后,onChangehui 捕获到照片的数组,并将每一张照片进行遍历,每张照片都会被要求转换为Data类型,然后Data存储在newPhotoData变量中,并弹出命名弹窗。
if showNamingAlert {
    ZStack {
        Color.black.opacity(0.3)
            .frame(maxWidth: .infinity,maxHeight: .infinity)
            .edgesIgnoringSafeArea(.all)

        VStack(spacing: 20) {
            if let photoData = newPhotoData, let photo = UIImage(data: photoData) {
                Image(uiImage: photo)
                    .resizable()
                    .scaledToFill()
                    .frame(width: 250, height: 200)
                    .clipped()
                    .cornerRadius(10)
            }
            TextField("输入照片名称", text: $newPhotoName)
                .textFieldStyle(RoundedBorderTextFieldStyle())
                .padding()
                .frame(width: 200)
                .cornerRadius(10)
            Button(action: {
                // 保存逻辑
                if let photoData = newPhotoData {
                    let newPhoto = Photo(id: UUID(), photoName: newPhotoName, photo: photoData)
                    modelContext.insert(newPhoto)
                }
                resetState()
            }, label: {
                Text("保存")
                    .frame(width: 200,height: 40)
                    .foregroundColor(Color.white)
                    .background(Color.blue)
                    .cornerRadius(10)
            })
        }
        .frame(width: 300,height: 400)
        .background(Color.white)
        .cornerRadius(10)
    }
}
命名弹窗会将newPhotoData变量转换为Image照片显示出来,并提供一个文本输入框要求对照片进行命名。照片命名完成后,点击保存按钮,照片会生成Photoshi li 并插入到SwiftData中,然后调用resetState()方法,重置newPhotoName、photoData和showNamingAlert提示这三个变量,以便让后面的照片重新命名。
// 重置状态
func resetState() {
    newPhotoData = nil
    newPhotoName = ""
    showNamingAlert = false
}
案例流程图

但是实际上,每次导入多种照片时,只能命名最后一个照片的名称,保存后,也只能导入最后一张照片到SwiftData。

问题原因
因为在异步处理多个照片时,每次新的照片选中都会覆盖 newPhotoData 和 showNamingAlert 的状态,导致无法逐个弹出命名提示框。
具体原因为:
在循环中,当多个照片被选中时,newPhotoData 和 showNamingAlert 的值被快速覆盖,只保留最后一个选中的照片信息。
每次修改 pickerItems 时,showNamingAlert 立即被设为 true,而没有等待当前命名完成。
解决方案
需要维护一个待命名照片的队列,让提示框逐个处理队列中的照片。
具体来讲,引入一个队列来存储需要命名的照片数据,弹出提示框时,从队列中取出第一张照片进行处理,用户完成命名后,继续处理队列中的下一张照片。
首先,定义一个照片队列的数组,内容是一个Photo数组。
@State private var namingQueue: [Photo] = [] // 待命名的照片队列在PhotosPicker选择照片时,将每张照片新增到照片队列当中:
PhotosPicker("新增照片", selection: $pickerItems, matching: .images)
    .onChange(of: pickerItems) { _, newItems in
        for item in newItems {
            Task {
                if let data = try? await item.loadTransferable(type: Data.self) {
                    var photo = Photo(id: UUID(), photoName: "", photo: data)
                    namingQueue.append(photo)
                }
                resetState()
            }
        }
    }
}
从这里可以看到每张照片都会在转换为Data类型后,生成一个Photo实例 ,然后将该实例添加到照片队列中。之后调用resetState方法,激活照片命名页面:
func resetState() {
    showNamingAlert = !namingQueue.isEmpty
}
resetState方法会判断namingQueue照片队列是否为空,如果不为空,则showNamingAlert被赋值为true。
因为需要操作的是namingQueue照片队列的每一张照片,因此在照片命名页面中需要新增一个激活条件:
if showNamingAlert,let currentPhoto = namingQueue.first { }那就是showNamingAlert为true时,获取照片队列中的首个Photo实例,然后给这个Photo实例命名。
其中,照片、文本输入框和按钮,都绑定这个Photo实例:
VStack(spacing: 20) {
    if let uiPhoto = currentPhoto.photo,let photo = UIImage(data: uiPhoto) {
        Image(uiImage: photo)
            .resizable()
            .scaledToFill()
            .frame(width: 250, height: 200)
            .clipped()
            .cornerRadius(10)
    }
    TextField("输入照片名称", text: Binding(
        get: { currentPhoto.photoName },
        set: { currentPhoto.photoName = $0 }))
    .textFieldStyle(RoundedBorderTextFieldStyle())
    .padding()
    .frame(width: 200)
    .cornerRadius(10)
    Button(action: {
        // 保存逻辑
        modelContext.insert(currentPhoto)
        namingQueue.removeFirst()
        resetState() // 检查是否需要显示命名弹窗
    }, label: {
        Text("保存")
            .frame(width: 200,height: 40)
            .foregroundColor(Color.white)
            .background(Color.blue)
            .cornerRadius(10)
    })
}
.frame(width: 300,height: 400)
.background(Color.white)
.cornerRadius(10)
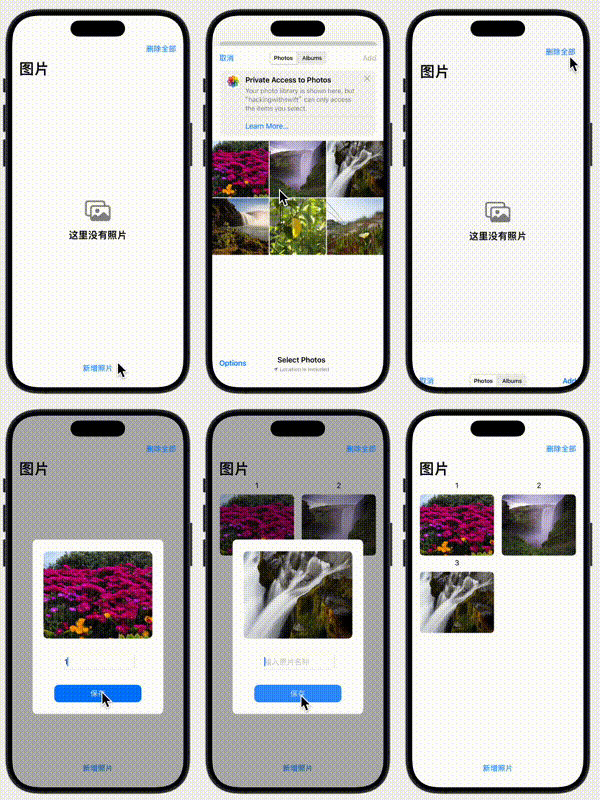
当输入名称后,修改当前的实例名称。点击保存按钮时,将当前实例保存到Swift Data中,在namingQueue照片队列中,删除首个实例,然后重新判断是否需要命名弹窗。

实现效果:

以上就是异步任务调度队列的具体实现,通过数组和数组方法的管理,实现依次对每张图片的命名。
扩展知识
当检测命名时,不使用resetState()方法进行判断,仍然可以实现依次命名的效果。
只需要在PhotosPicker中将showNamingAlert改为true,即可实现检测的效果。
PhotosPicker("新增照片", selection: $pickerItems, matching: .images)
.onChange(of: pickerItems) { _, newItems in
    for item in newItems {
        Task {
            if let data = try? await item.loadTransferable(type: Data.self) {
                var photo = Photo(id: UUID(), photoName: "", photo: data)
                namingQueue.append(photo)
            }
            showNamingAlert = true
        }
    }
}
这是因为,命名照片弹窗的代码的if条件依赖于showNamingAlert 和 namingQueue.first:
if showNamingAlert, let currentPhoto = namingQueue.first {
    ZStack {
        // 弹窗视图
    }
}
每次插入新照片到 namingQueue 照片队列后,设置的 showNamingAlert = true会触发视图刷新。
当点击保存按钮时,通过 namingQueue.removeFirst() 移除了当前队列的第一个项目。
SwiftUI 的视图系统会重新检查条件 if showNamingAlert, let currentPhoto = namingQueue.first。

如果队列中还有元素,则显示下一张照片的命名弹窗。
如果队列为空,namingQueue.first 为 nil,条件自动不成立,弹窗消失。
因此,showNamingAlert = true 是显式触发弹窗的关键,而 namingQueue.removeFirst() 负责隐式关闭弹窗(当队列为空时)。

相关文章
SwiftUI 100 天:https://www.hackingwithswift.com/guide/ios-swiftui/6/3/challenge
完整代码
ContentView代码
import SwiftUI
import SwiftData
import PhotosUI

struct ContentView: View {
    @Environment(\.modelContext) var modelContext
    @Query var photos:[Photo]
    @State private var isDeleteAll = false
    @State private var pickerItems: [PhotosPickerItem] = []
    @State private var showNamingAlert = false
    @State private var namingQueue: [Photo] = [] // 待命名的照片队列
    let columns = [
        GridItem(.fixed(180)), // 自动根据屏幕宽度生成尽可能多的单元格,宽度最小为 80 点
        GridItem(.fixed(180))
    ]

    // 重置状态
    func resetState() {
        showNamingAlert = !namingQueue.isEmpty
    }

    var body: some View {
        NavigationStack {
            ZStack {
                // 照片视图列表
                VStack {
                    if !photos.isEmpty {
                        ScrollView {
                            LazyVGrid(columns: columns) {
                                ForEach(photos) { img in
                                    VStack {
                                        if let photoData = img.photo, let photo = UIImage(data: photoData) {
                                            Text(img.photoName)
                                            Image(uiImage: photo)
                                                .resizable()
                                                .scaledToFill()
                                                .frame(width: 170, height: 140)
                                                .clipped()
                                                .cornerRadius(8)
                                        }
                                    }
                                }
                            }
                        }
                    } else {
                        ContentUnavailableView("这里没有照片", systemImage: "photo.on.rectangle")
                    }
                    Spacer()
                    PhotosPicker("新增照片", selection: $pickerItems, matching: .images)
                        .onChange(of: pickerItems) { _, newItems in
                            for item in newItems {
                                Task {
                                    if let data = try? await item.loadTransferable(type: Data.self) {
                                        var photo = Photo(id: UUID(), photoName: "", photo: data)
                                        namingQueue.append(photo)
                                    }
                                    resetState()
                                }
                            }
                        }
                }
                // 照片名称填写页面
                if showNamingAlert,let currentPhoto = namingQueue.first {
                    ZStack {
                        Color.black.opacity(0.3)
                            .frame(maxWidth: .infinity,maxHeight: .infinity)
                            .edgesIgnoringSafeArea(.all)

                        VStack(spacing: 20) {
                            if let uiPhoto = currentPhoto.photo,let photo = UIImage(data: uiPhoto) {
                                Image(uiImage: photo)
                                    .resizable()
                                    .scaledToFill()
                                    .frame(width: 250, height: 200)
                                    .clipped()
                                    .cornerRadius(10)
                            }
                            TextField("输入照片名称", text: Binding(
                                get: { currentPhoto.photoName },
                                set: { currentPhoto.photoName = $0 }))
                            .textFieldStyle(RoundedBorderTextFieldStyle())
                            .padding()
                            .frame(width: 200)
                            .cornerRadius(10)
                            Button(action: {
                                // 保存逻辑
                                modelContext.insert(currentPhoto)
                                namingQueue.removeFirst()
                                resetState() // 检查是否需要显示命名弹窗
                            }, label: {
                                Text("保存")
                                    .frame(width: 200,height: 40)
                                    .foregroundColor(Color.white)
                                    .background(Color.blue)
                                    .cornerRadius(10)
                            })
                        }
                        .frame(width: 300,height: 400)
                        .background(Color.white)
                        .cornerRadius(10)
                    }
                }
            }
            .navigationTitle("图片")
            .toolbar {
                ToolbarItem(placement: .topBarTrailing, content: {
                    Button("删除全部") {
                        isDeleteAll = true
                    }
                })
            }
            .alert("删除全部图片",isPresented: $isDeleteAll){
                Button("确定", role: .destructive) {
                    try? modelContext.delete(model:Photo.self)
                }
                Button("取消",role: .cancel) {
                    isDeleteAll = false
                }
            }

        }
    }

}

#Preview {
    ContentView()
        .modelContainer(for: Photo.self)
}
Photos结构代码
import SwiftUI
import SwiftData
import Foundation
import PhotosUI

@Model
class Photo {
    var id: UUID
    var photoName = ""
    var photo: Data?

    init(id: UUID, photoName: String = "", photo: Data? = nil) {
        self.id = id
        self.photoName = photoName
        self.photo = photo
    }
}


