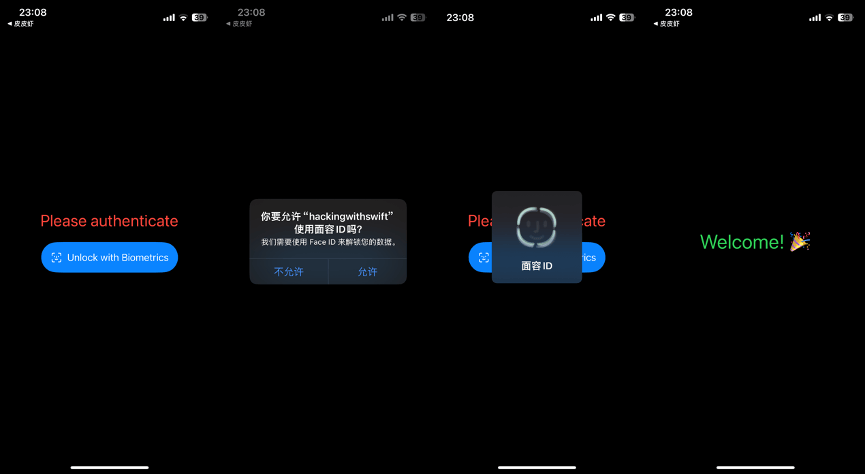
在 SwiftUI 中,可以通过集成 LocalAuthentication 框架来使用 Touch ID 和 Face ID。这些功能被统称为 生物识别认证,适用于设备锁定、应用保护、数据安全等场景。
实现步骤
1、导入框架
引入 LocalAuthentication 框架以访问生物识别认证功能。
import LocalAuthentication2、创建认证逻辑
使用 LAContext 来执行生物识别认证。
3. 集成到 SwiftUI 界面
将认证逻辑绑定到 SwiftUI 的视图中,通过按钮触发或其他条件自动执行。
完整代码示例
以下是一个使用 Touch ID 或 Face ID 的示例应用:
import SwiftUI
import LocalAuthentication

struct ContentView: View {
    @State private var isAuthenticated = false
    @State private var errorMessage = ""

    var body: some View {
        VStack(spacing: 20) {
            if isAuthenticated {
                Text("Welcome! 🎉")
                    .font(.largeTitle)
                    .foregroundColor(.green)
            } else {
                Text("Please authenticate")
                    .font(.title)
                    .foregroundColor(.red)
                Button(action: authenticate) {
                    Label("Unlock with Biometrics", systemImage: "faceid")
                        .padding()
                        .background(Color.blue)
                        .foregroundColor(.white)
                        .clipShape(Capsule())
                }
                if !errorMessage.isEmpty {
                    Text("Error: \(errorMessage)")
                        .foregroundColor(.red)
                        .font(.footnote)
                }
            }
        }
        .padding()
    }

    func authenticate() {
        let context = LAContext()
        var error: NSError?

        // 检查设备是否支持生物识别
        if context.canEvaluatePolicy(.deviceOwnerAuthenticationWithBiometrics, error: &error) {
            let reason = "Authenticate to access your account"

            context.evaluatePolicy(.deviceOwnerAuthenticationWithBiometrics, localizedReason: reason) { success, authenticationError in
                DispatchQueue.main.async {
                    if success {
                        isAuthenticated = true
                        errorMessage = ""
                    } else {
                        isAuthenticated = false
                        errorMessage = authenticationError?.localizedDescription ?? "Unknown error"
                    }
                }
            }
        } else {
            // 设备不支持生物识别
            DispatchQueue.main.async {
                errorMessage = error?.localizedDescription ?? "Biometric authentication is not available"
            }
        }
    }
}

#Preview {
    ContentView()
}
代码功能
1、检查当前设备是否支持生物识别验证。
2、如果支持,则调用生物识别功能进行身份验证。
3、根据验证结果(成功或失败),执行不同的逻辑。
4、如果设备不支持生物识别,则返回错误信息。
代码解析
这段 Swift 代码实现了设备生物识别验证(如 Face ID 或 Touch ID)的逻辑,主要是用来检查设备是否支持生物识别验证,并根据用户的验证结果执行相应操作。以下是详细解析:
1、创建生物识别上下文
let context = LAContext()
var error: NSError?
LAContext 是 LocalAuthentication 框架中的类,用来管理身份验证的上下文环境。
error 是一个可选的 NSError,用于存储设备不支持生物识别验证时的错误信息。
2、检查设备是否支持生物识别
if context.canEvaluatePolicy(.deviceOwnerAuthenticationWithBiometrics, error: &error)canEvaluatePolicy 是用来检查设备是否支持特定的身份验证策略。
参数 .deviceOwnerAuthenticationWithBiometrics 表示使用生物识别(如 Face ID 或 Touch ID)验证用户身份。
如果设备支持生物识别功能,canEvaluatePolicy 返回 true;否则返回 false 并将错误信息存储在 error 中。
3、调用生物识别验证
context.evaluatePolicy(.deviceOwnerAuthenticationWithBiometrics, localizedReason: reason) { success, authenticationError in
    DispatchQueue.main.async {
        if success {
            isAuthenticated = true
            errorMessage = ""
        } else {
            isAuthenticated = false
            errorMessage = authenticationError?.localizedDescription ?? "Unknown error"
        }
    }
}1)evaluatePolicy 方法:
发起生物识别验证,弹出系统提供的身份验证界面。
参数:
.deviceOwnerAuthenticationWithBiometrics:生物识别验证策略。
localizedReason:向用户解释为什么需要验证(会显示在系统弹出的验证对话框中)。
2)闭包返回两个参数:
success:一个布尔值,表示验证是否成功。
authenticationError:验证失败时的错误信息。
3)DispatchQueue.main.async:
确保 UI 更新在主线程中完成。
4)成功时的逻辑:
isAuthenticated = true
errorMessage = ""5)失败时的逻辑:
isAuthenticated = false
errorMessage = authenticationError?.localizedDescription ?? "Unknown error"
4、处理设备不支持生物识别的情况
DispatchQueue.main.async {
    errorMessage = error?.localizedDescription ?? "Biometric authentication is not available"
}
如果设备不支持生物识别,进入 else 块。
更新 errorMessage,告知用户设备不支持生物识别验证,并提供错误的具体描述。

生物识别认证报错
在首次识别时,可能存在无法识别认证的情况,Xcode报错输出:
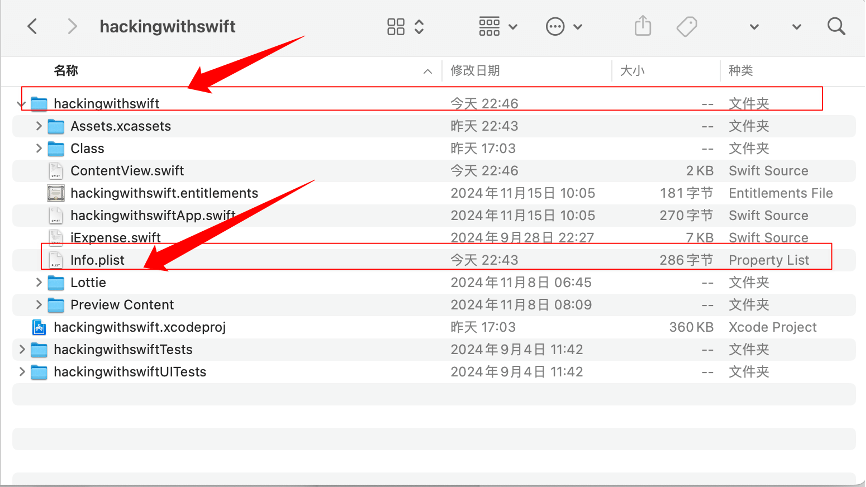
This app has crashed because it attempted to access privacy-sensitive data without a usage description. The app's Info.plist must contain an NSFaceIDUsageDescription key with a string value explaining to the user how the app uses this data.这是因为应用没有在Info.plist文件中声明使用Face ID的权限描述,因此iOS系统拒绝了对生物识别功能的访问。这是一个必要的步骤,否则应用会崩溃。
解决步骤
1、找到项目的Info.plist文件。

2、在Info.plist文件中新增:
Privacy - Face ID Usage Description

我们需要使用 Face ID 来解锁您的数据。 // Value值
Privacy – Face ID Usage Description 是一个键(Key),它代表应用请求使用 Face ID 功能时显示的权限描述。
右侧的 Value 列是键的对应值,也就是应用向用户解释为什么需要使用 Face ID 的具体内容。
3、重新启动应用,问题得到解决。
用户控制生物识别认证
1、添加控制生物识别的布尔值
@AppStorage("isBiometricEnabled") private var isBiometricEnabled = false2、给生物识别添加判断,检查是否启用识别变量
// 检查用户是否启用了生物识别验证
guard isBiometricEnabled else {
    print("Biometric authentication is disabled by the user.")
    return
}
3、添加生物识别控制按钮
Toggle("Enable Biometric Authentication", isOn: $isBiometricEnabled)
.padding()
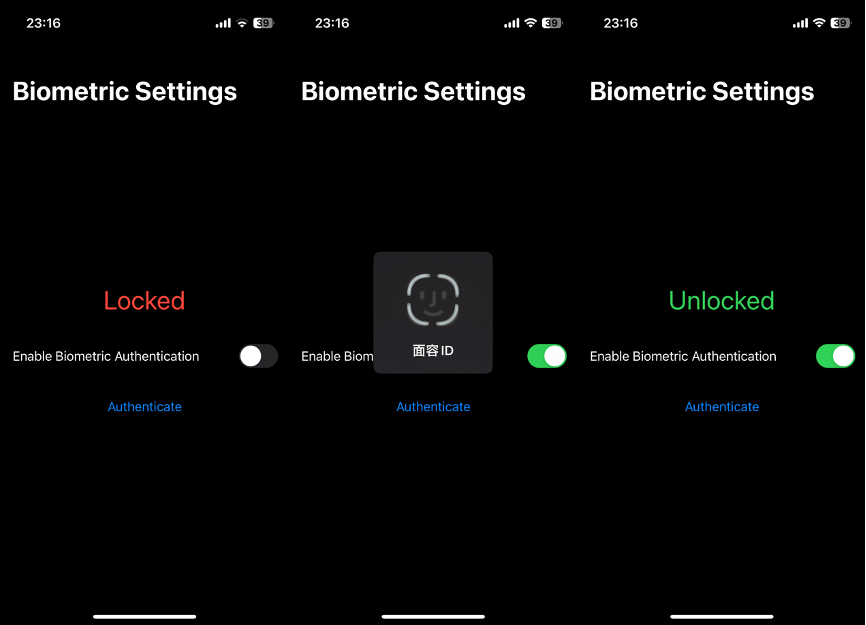
修改后,实现用户通过按钮控制生物识别认证功能。
实现效果

完整代码示例
import SwiftUI
import LocalAuthentication

struct ContentView: View {
    @State private var isUnlocked = false
    @AppStorage("isBiometricEnabled") private var isBiometricEnabled = false

    func authenticate() {
        let context = LAContext()
        var error: NSError?

        // 检查用户是否启用了生物识别验证
        guard isBiometricEnabled else {
            print("Biometric authentication is disabled by the user.")
            return
        }

        // 检查是否可以使用生物识别
        if context.canEvaluatePolicy(.deviceOwnerAuthenticationWithBiometrics, error: &error) {
            let reason = "We need to unlock your data."

            context.evaluatePolicy(.deviceOwnerAuthenticationWithBiometrics, localizedReason: reason) { success, authenticationError in
                DispatchQueue.main.async {
                    if success {
                        self.isUnlocked = true
                    } else {
                        print("Authentication failed: \(authenticationError?.localizedDescription ?? "Unknown error")")
                    }
                }
            }
        } else {
            print("Biometric authentication is not available: \(error?.localizedDescription ?? "Unknown error")")
        }
    }

    var body: some View {
        NavigationView {
            VStack {
                if isUnlocked {
                    Text("Unlocked")
                        .font(.largeTitle)
                        .foregroundColor(.green)
                } else {
                    Text("Locked")
                        .font(.largeTitle)
                        .foregroundColor(.red)
                }

                Toggle("Enable Biometric Authentication", isOn: $isBiometricEnabled)
                    .padding()

                Button("Authenticate") {
                    authenticate()
                }
                .padding()
            }
            .navigationTitle("Biometric Settings")
        }
    }
}

#Preview {
    ContentView()
}
生物识别验证的备选方案
如果设备不支持生物识别或者用户拒绝验证,可以提供密码作为备选方案:
context.canEvaluatePolicy(.deviceOwnerAuthentication, error: &error)deviceOwnerAuthentication 的含义
.deviceOwnerAuthentication 是一种更通用的身份验证策略。
它不仅支持生物识别验证(如 Face ID 或 Touch ID),还支持设备密码(PIN、图案或设备解锁密码)作为备选方案。
如果设备不支持生物识别,或者用户多次失败,系统会自动回退到设备密码验证。
如何使用
可以将 .deviceOwnerAuthentication 添加到现有代码中,作为生物识别验证的备选方案。例如:
func authenticate() {
    let context = LAContext()
    var error: NSError?

    // 检查设备是否支持生物识别或设备密码验证
    if context.canEvaluatePolicy(.deviceOwnerAuthentication, error: &error) {
        let reason = "Authenticate to access your account"

        context.evaluatePolicy(.deviceOwnerAuthentication, localizedReason: reason) { success, authenticationError in
            DispatchQueue.main.async {
                if success {
                    isAuthenticated = true
                    errorMessage = ""
                } else {
                    isAuthenticated = false
                    errorMessage = authenticationError?.localizedDescription ?? "Unknown error"
                }
            }
        }
    } else {
        // 设备不支持生物识别或密码验证
        DispatchQueue.main.async {
            errorMessage = error?.localizedDescription ?? "Authentication is not available"
        }
    }
}
1、替换 deviceOwnerAuthenticationWithBiometrics
将策略从 .deviceOwnerAuthenticationWithBiometrics 替换为 .deviceOwnerAuthentication:
如果用户设备支持生物识别,会优先使用生物识别。
如果用户多次失败,或者设备不支持生物识别,系统会回退到密码验证。
2、用户体验改进
用户在生物识别验证失败后,可以直接输入密码继续验证,而无需额外处理逻辑。
即使用户的设备完全不支持生物识别(例如旧设备),仍然可以通过密码验证。
注意事项
1、Face ID/Touch ID 描述不再适用
在弹出的验证对话框中,localizedReason 会展示给用户。如果用户用的是密码验证,这个描述可能需要更通用的描述,例如:
进行身份验证以安全访问您的帐户
2、错误处理
在用户取消或失败后,可以检查 authenticationError,并根据错误类型提供具体提示。例如:
LAError.userCancel:用户取消验证。
LAError.authenticationFailed:身份验证失败。
3、回退逻辑
如果用户设备完全不支持 .deviceOwnerAuthentication(非常少见),可以提示用户使用另一种方法访问应用(例如注册账号或输入固定密码)。
实际应用
在实际的应用中,将 authenticate 方法封装到单独的 Swift 文件中是更好的选择,尤其是在以下情况下:
1、代码复用性:
如果应用需要在多个地方使用生物识别验证(例如登录、支付或解锁某些功能),将认证逻辑封装到一个单独的文件中可以避免代码重复,提高复用性。
2、代码可读性:
将生物识别相关的代码与视图逻辑分离,可以让 ContentView 保持简洁,专注于界面布局和交互,而认证逻辑则集中在一个专门的文件中,便于维护和扩展。
3、测试和维护:
单独的文件更容易进行单元测试,并且在未来需要修改认证逻辑时,改动的范围更集中。
1、创建认证服务文件
创建一个新的 Swift 文件,例如 BiometricAuth.swift:
import LocalAuthentication

struct BiometricAuth {

    static let shared = BiometricAuth()

    private init() {}
    func authenticate(reason: String, completion: @escaping (Bool, String?) -> Void) {
        let context = LAContext()
        var error: NSError?

        // 检查设备是否支持生物识别或设备密码验证
        if context.canEvaluatePolicy(.deviceOwnerAuthentication, error: &error) {

            context.evaluatePolicy(.deviceOwnerAuthentication, localizedReason: reason) { success, authenticationError in
                DispatchQueue.main.async {
                    if success {
                        completion(true,nil)
                    } else {
                        let message = authenticationError?.localizedDescription ?? "Authentication failed"
                        completion(false, message)
                    }
                }
            }
        } else {
            // 设备不支持生物识别或密码验证
            DispatchQueue.main.async {
                    let message = error?.localizedDescription ?? "Biometric authentication is not available"
                    completion(false, message)
            }
        }
    }
}
authenticate 方法:
reason: 传入用于显示在 Face ID 或 Touch ID 提示框中的说明。
completion: 回调函数,用于返回认证结果(成功或失败)和错误信息。
2、在视图中使用封装方法
在 ContentView 中调用封装的 BiometricAuth 服务:
struct ContentView: View {
    @State private var isAuthenticated = false  // false表示未通过人脸识别
    @State private var isErrorMessage = false    // 人脸识别错误信息,true表示显示
    @State private var showHomeView = false // 进入首页
    @AppStorage("isBiometricEnabled") var isBiometricEnabled = false   // true表示启用密码保护

    // 密码保护方法
    func authenticate() {
        // 检查用户是否启用了生物识别验证
        guard isBiometricEnabled else {
            print("Biometric authentication is disabled by the user.")
            return
        }
        BiometricAuth.shared.authenticate(reason: "Authenticate to access your account") { success, error in
            if success {
                isAuthenticated = true
                isErrorMessage = false
            } else {
                isAuthenticated = false
                isErrorMessage = true
            }
        }
    }

    var body: some View {
        if isBiometricEnabled && !isAuthenticated && !showHomeView {
        // 当设置人脸识别,并且人脸识别为false时显示验证视图
            BiometricAuthView(isAuthenticated: $isAuthenticated,isErrorMessage:$isErrorMessage) {
                authenticate()
            }
        } else {
            // 如果人脸通过,显示主界面内容
            NavigationStack {
                // 主界面内容
            }
        }
    }
}
3、生物识别视图
import SwiftUI

struct BiometricAuthView: View {
    @Binding var isAuthenticated: Bool
    @Binding var isErrorMessage: Bool
    var onAuthenticate: () -> Void
    // 鸣谢页面
    var body: some View {
        VStack {
            Spacer()
            Button(action: {
                onAuthenticate() // 调用闭包执行认证
            }, label: {
                HStack {
                    Image(systemName: "faceid")
                        .resizable()
                        .scaledToFit()
                        .frame(width: 24, height: 24) // 设置具体大小
                    Text("Unlock")
                }
            })
            if isErrorMessage {
                Text("Unlock failed, please try again.")
            }
            Spacer()
        }
    }
}
4、应用逻辑梳理
创建了一个BiometricAuth文件用于封装生物识别代码,通过单例模式方便全局调用。
在视图中使用一个封装方法:
// 密码保护方法
func authenticate() {
    // 检查用户是否启用了生物识别验证
    guard isBiometricEnabled else {
        print("Biometric authentication is disabled by the user.")
        return
    }
    BiometricAuth.shared.authenticate(reason: "Authenticate to access your account") { success, error in
        if success {
            isAuthenticated = true
            isErrorMessage = false
        } else {
            isAuthenticated = false
            isErrorMessage = true
        }
    }
}
这个方法的作用是,当用户通过按钮或其他方式触发authenticate方法后,首先判断定义的isBiometricEnabled(是否启用密码保护),这是一个UserDefaults属性。如果用户启用了密码保护,那么isBiometricEnabled就变成true。
如果没有启用,则guard会直接退出该方法。
guard isBiometricEnabled else {}如果启用了密码保护(isBiometricEnabled为true),那么authenticate方法会通过BiometricAuth的单例模式,执行BiometricAuth内部的authenticate方法。
authenticate方法传递了一个固定的reason字符串,并传递了一个success布尔值和error字符串。
当返回的success为true时,表示验证成功。isAuthenticated赋值为true,表示通过人脸识别。isErrorMessage赋值为false,表示不显示错误信息。否则,验证不通过,显示错误信息。
在视图中的逻辑为,如果开启了密码保护,未通过人脸识别,未显示主视图,那么显示验证视图。
if isBiometricEnabled && !isAuthenticated && !showHomeView {
    // 当设置人脸识别,并且人脸识别为false时显示验证视图
        BiometricAuthView(isAuthenticated: $isAuthenticated,isErrorMessage:$isErrorMessage) {
            authenticate()
        }
    } else {
        // 如果人脸通过,显示主界面内容
        ...
    }
}
前面两个可以理解,开启密码保护,未通过人脸识别,那么就应该显示验证视图。第三个显示主视图的需求主要在于当应用开启人脸识别后,不立即显示验证视图。
当在视图中,默认情况下密码保护可能是未开启的状态,人脸识别也是未启用的状态,这就导致,当启用密码保护后,视图会立即弹出验证视图,影响到用户体验,其次是如果你的启用密码保护是一个Sheet页,当点击按钮启用密码保护时,根据前面的判断会自己弹出验证视图。当验证完成后,原先的Sheet页可能会被弹出的验证视图顶替,就导致无法再打开Sheet页,因为原先的Sheet页没有关闭掉,但也没有显示,而识别弹出的视图以其他的方法顶替。因此,就会卡在无法打开Sheet页的情况。
解决方案就是,设置一个进入主视图的变量showHomeView。如果已经进入到主视图,那么可能是已经解锁或者未启用密码保护的状态。
if isBiometricEnabled && !isAuthenticated && !showHomeView {
    // 当设置人脸识别,并且人脸识别为false时显示验证视图
        BiometricAuthView(isAuthenticated: $isAuthenticated,isErrorMessage:$isErrorMessage) {
            authenticate()
        }
    } else {
        // 如果人脸通过,显示主界面内容
    NavigationStack {
    }
    .onAppear {
        showHomeView = true
    }
}
在设置视图中,启用密码保护后,人脸识别条件会判定是否显示验证视图:
if isBiometricEnabled && !isAuthenticated && !showHomeView这里的isBiometricEnabled(密码保护)为true,!isAuthenticated(是否通过人脸识别,默认为false)也变成了true,那么应该会立即弹出验证视图,但是当校验showHomeView变量时,因为已经进入过主视图,那么!showHomeView就变成了false。因此不会在开启密码保护后,马上弹出验证中视图。
而验证视图的部分则是通过Binding绑定了主视图的两个变量。如果验证视图通过验证,绑定的变量发生改变,完成验证。
总结
本文中的密码保护、人脸识别、生物识别实际上都指的是,通过LocalAuthentication完成的校验功能。
通过LocalAuthentication可以在实际的应用中,丰富应用的功能,保护应用的安全隐私。但实际上如果密码保护是通过UserDefault存储的话,实际上并不会真正的保护隐私数据,只是应用识别的一个障眼法。
参考资料
Using Touch ID and Face ID with SwiftUI:https://www.hackingwithswift.com/books/ios-swiftui/using-touch-id-and-face-id-with-swiftui


