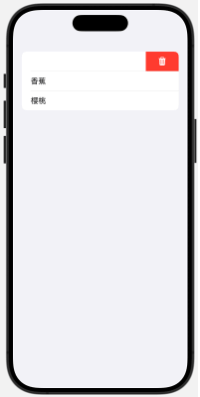
在 SwiftUI 中,swipeActions 用于为列表或视图中的单元格提供滑动手势触发的操作,例如向左或向右滑动时显示的按钮。它在处理诸如删除、标记或其他快速操作时非常有用。
基本用法
以下是一个使用 swipeActions 添加滑动操作的示例:
struct ContentView: View {
    @State private var items = ["苹果", "香蕉", "樱桃"]

    var body: some View {
        List {
            ForEach(items, id: \.self) { item in
                Text(item)
                    .swipeActions {
                        Button(role: .destructive) {
                            deleteItem(item)
                        } label: {
                            Label("删除", systemImage: "trash")
                        }
                    }
            }
        }
    }

    func deleteItem(_ item: String) {
        items.removeAll { $0 == item }
    }
}
代码解析
1、swipeActions 修饰符
将滑动操作添加到视图。
2、Button
每个滑动操作是一个按钮,可以指定 action 和 label。
3、role 属性
可以为按钮指定角色,例如 .destructive 会自动应用红色样式,用于危险操作(如删除)。
4、Label
定义按钮的图标和文字。
向左或向右滑动
默认情况下,swipeActions 是在向左滑动时显示的。要为向右滑动添加操作,可以设置 edge 参数:
.swipeActions(edge: .trailing) {  // 默认方向,向左滑动
    Button("删除") {
        print("删除操作")
    }
}
.swipeActions(edge: .leading) {  // 向右滑动
    Button("标记为已读") {
        print("标记操作")
    }
}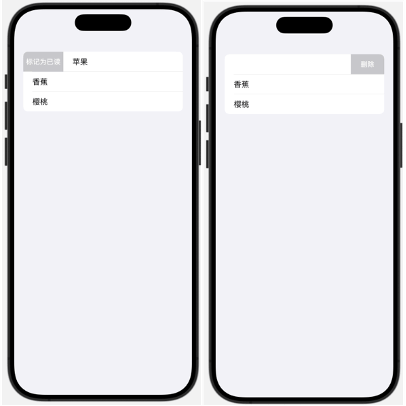
.trailing:向左滑动显示操作(默认)。
.leading:向右滑动显示操作。
多个滑动操作
可以为单个滑动动作提供多个按钮:
.swipeActions {
    Button(role: .destructive) {
        print("删除操作")
    } label: {
        Label("删除", systemImage: "trash")
    }

    Button {
        print("标记为已读")
    } label: {
        Label("标记", systemImage: "envelope.open")
    }
}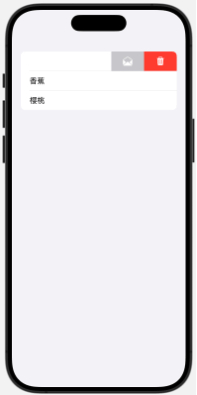
这些按钮会依次排列。
自定义按钮颜色
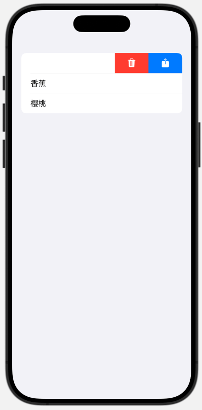
可以使用 tint 修改按钮的颜色:
.swipeActions {
    Button {
        print("分享操作")
    } label: {
        Label("分享", systemImage: "square.and.arrow.up")
    }
    .tint(.blue) // 自定义颜色

    Button(role: .destructive) {
        print("删除操作")
    } label: {
        Label("删除", systemImage: "trash")
    }
    .tint(.red) // 红色表示危险操作
}
完整示例:左右滑动操作
struct ContentView: View {
    @State private var items = ["任务 1", "任务 2", "任务 3"]

    var body: some View {
        List {
            ForEach(items, id: \.self) { item in
                Text(item)
                    .swipeActions(edge: .trailing) {
                        Button(role: .destructive) {
                            deleteItem(item)
                        } label: {
                            Label("删除", systemImage: "trash")
                        }
                    }
                    .swipeActions(edge: .leading) {
                        Button {
                            markAsCompleted(item)
                        } label: {
                            Label("完成", systemImage: "checkmark")
                        }
                        .tint(.green)
                    }
            }
        }
    }

    func deleteItem(_ item: String) {
        items.removeAll { $0 == item }
    }

    func markAsCompleted(_ item: String) {
        print("\(item) 已完成")
    }
}
支持的平台
iOS 15 及更高版本:支持 swipeActions 修饰符。
iPadOS 15 及更高版本:提供相同功能。
不支持 macOS 或 watchOS。
使用场景
邮件管理:滑动标记为已读、归档或删除。
任务管理:快速标记完成、推迟或删除任务。
列表项操作:如移动、分享、删除列表项。
swipeActions 提供了直观的用户体验,适合需要快速操作的应用场景。
List的搭配使用
swipeActions必须通过List和ForEach搭配使用,如果仅使用ForEach将无法实现swipeActions的效果。
ForEach和List在搭配实现时,可能会出现因为List引入一些默认的样式,比如额外的边距。

因此,在使用的过程中可考虑调整List样式。
.listRowInsets(EdgeInsets()) // 移除默认的边距
.listRowSeparator(.hidden) // 去掉分隔线
.listStyle(PlainListStyle()) // 更改列表样式
示例代码
VStack {
    List{
        ForEach(exchangeRate.CommonCurrencies, id:\.self) { item in
            HStack {
                // 各列表项
            }
            .listRowInsets(EdgeInsets()) // 移除默认的边距
            .listRowSeparator(.hidden) // 去掉分隔线
            .swipeActions(edge: .leading) {
                Button {
                } label: {
                    Text("切换货币")
                }
                .tint(.blue)    // 按钮背景颜色为.blue
            }
        }
    }
    .listStyle(PlainListStyle()) // 更改列表样式
}