喜报,就在今天凌晨4点,本站完成了从HTTP切换至HTTPS的协议升级,这也意味着这两天的折磨的终止,也让我在学习Docker的路上迈出坚实的一步,为了解决该问题,已经排查了两天,下面将会把部署的相关参数放出来,给大家作为参考,并让其他人也能将自己的网站升级为HTTPS。
部署场景
- 服务器CentOS版本: CentOS Linux release 7.9.2009 (Core)
- Nginx版本:nginx/1.20.1
- Docker版本:25.0.3, build 4debf41
- MySQL版本:Ver 8.0.36 for Linux on x86_64 (MySQL Community Server – GPL)
- WordPress版本:6.4.3
前情概要
近期在学习Linux关于Docker部分,发现有使用Docker搭建WordPress的教程,然后了解到可以通过WordPress(CMS)搭建自己的网站并进行内容管理,跟之前自身想要搭建个网站的想法一样,然后直接开始下载WordPress搭建网站,搭建的过程中发现存在Sock文件不存在等各种问题,经过一系列排查后,仍然无法搭建,后退而求其次,选择用Docker直接部署WordPress。
搭建WordPress后,发现访问网站时,谷歌浏览器提示不安全,然后想直接改为HTTPS协议,在WordPress搭建之前,网站已经使用了Node服务器展示纯静态页面,Node服务器已经支持HTTPS协议的,想着直接把ip和端口改过来就行,后来发现跟想象的不一样,WordPress在HTTPS协议下会存在页面图片缺失、样式丢失等问题,然后又经过一系列研究,完成了HTTPS的协议切换。
Docker配置文件
首先,配置WordPress容器下的WordPress配置文件。
[root@fangjunyu]~# cd /opt/docker
[root@fangjunyu]/opt/docker# ls
docker-compose.yml docker-compose.yml_cantuseversion
[root@fangjunyu]/opt/docker# cat docker-compose.yml
version: '3.7'
services:
wordpress:
image: wordpress:latest
ports:
- "8000:80"
- "8001:443"
restart: always
environment:
WORDPRESS_DB_HOST: "111.231.22.116:3306"
WORDPRESS_DB_USER: user
WORDPRESS_DB_PASSWORD: password
WORDPRESS_DB_NAME: wordpress
volumes:
- /var/www/html
注意:因为80和443端口已经被Nginx占用并监听,因此在配置文件中则设置对应的WordPress端口为8000和8001(此处自行调整),数据库则填写对应的ip+端口号、账号和密码。
另外,配置要全面,如果要修改该配置文件,可能会造成之前WordPress容器的ID变化、Dokcer容器内的配置文件丢失/还原的情况,因此要一次性填好,不要二次更改。
然后,我们用在Docker配置文件目录下用DockerCompose启动该配置文件,
[root@fangjunyu]/opt/docker# docker-compose up -d
[+] Running 1/0
✔ Container docker-wordpress-1 Running 0.0s
[root@fangjunyu]/opt/docker# docker ps
CONTAINER ID IMAGE COMMAND CREATED STATUS PORTS NAMES
18cc785cc795 wordpress:latest "docker-entrypoint.s…" 10 hours ago Up 8 hours 0.0.0.0:8000->80/tcp, :::8000->80/tcp, 0.0.0.0:8001->443/tcp, :::8001->443/tcp docker-wordpress-1
[root@fangjunyu]/opt/docker# docker exec -it 18cc785cc795 bash
root@18cc785cc795:/var/www/html#
这时,我们进入到WordPress容器当中,首先,我们输入openssl,查看是否安装ssl
root@18cc785cc795:/var/www/html# openssl
OpenSSL> exit
root@18cc785cc795:/var/www/html#
能进入,说明我们已经安装了openssl,然后直接退出来。
下一步,我们还是在WordPress容器中,直接a2enmod ssl
root@18cc785cc795:/var/www/html# a2enmod ssl
Considering dependency setenvif for ssl:
Module setenvif already enabled
Considering dependency mime for ssl:
Module mime already enabled
Considering dependency socache_shmcb for ssl:
Module socache_shmcb already enabled
Module ssl already enabled
root@18cc785cc795:/var/www/html#
这表示a2enmod ssl也已经启用,注意,这个操作是在WordPress容器上,不是在上一步的OpenSSL中执行。
然后,我们给WordPress安装常用工具
root@18cc785cc795:/var/www/html# apt-get update
Hit:1 http://deb.debian.org/debian bullseye InRelease
Get:2 http://deb.debian.org/debian bullseye-updates InRelease [44.1 kB]
Get:3 http://security.debian.org/debian-security bullseye-security InRelease [48.4 kB]
Fetched 92.4 kB in 1s (89.6 kB/s)
Reading package lists... Done
root@18cc785cc795:/var/www/html# apt-get install vim
Reading package lists... Done
Building dependency tree... Done
Reading state information... Done
vim is already the newest version (2:8.2.2434-3+deb11u1).
0 upgraded, 0 newly installed, 0 to remove and 93 not upgraded.
root@18cc785cc795:/var/www/html# apt-get install net-tools
Reading package lists... Done
Building dependency tree... Done
Reading state information... Done
net-tools is already the newest version (1.60+git20181103.0eebece-1).
0 upgraded, 0 newly installed, 0 to remove and 93 not upgraded.
因为我已经安装过了,所以提示没有更新的包,首次安装需要输入y等确认,下载速度稍微慢一点。
安装完上述工具后,我们开始修改SSL配置文件,首先,我们退出WordPress容器,把SSL证书传到WordPress容器中
[root@fangjunyu]/opt/docker# cd /var/www/html
[root@fangjunyu]/var/www/html# ls
fangjunyu.com_bundle.crt fangjunyu.com_bundle.pem fangjunyu.com.csr fangjunyu.com.key wordpress
[root@fangjunyu]/var/www/html# docker cp fangjunyu.com_bundle.crt 18cc785cc795:/var/www/html
Successfully copied 6.14kB to 18cc785cc795:/var/www/html
[root@fangjunyu]/var/www/html# docker cp fangjunyu.com_bundle.pem 18cc785cc795:/var/www/html
Successfully copied 6.14kB to 18cc785cc795:/var/www/html
[root@fangjunyu]/var/www/html# docker cp fangjunyu.com.csr 18cc785cc795:/var/www/html
Successfully copied 2.56kB to 18cc785cc795:/var/www/html
[root@fangjunyu]/var/www/html# docker cp fangjunyu.com.key 18cc785cc795:/var/www/html
Successfully copied 3.58kB to 18cc785cc795:/var/www/html
[root@fangjunyu]/var/www/html#
然后,我们再进入WordPress容器中配置证书,修改/etc/apache2/sites-available/default-ssl.conf这个文件
[root@fangjunyu]/var/www/html# docker exec -it 18cc785cc795 bash
root@18cc785cc795:/var/www/html# ls
fangjunyu.com.csr fangjunyu.com.key fangjunyu.com_bundle.crt fangjunyu.com_bundle.pem . . .
root@18cc785cc795:/var/www/html# cat /etc/apache2/sites-available/default-ssl.conf
ServerAdmin fangjunyu.com@gmail.com
DocumentRoot /var/www/html
ServerName www.fangjunyu.com
...
SSLEngine on
...
SSLCertificateFile /var/www/html/fangjunyu.com_bundle.pem
SSLCertificateKeyFile /var/www/html/fangjunyu.com.key
...
SSLCertificateChainFile /var/www/html/fangjunyu.com_bundle.crt
...我们把这些参数配置上,修改配置文件前一定要做好备份!
我们再把这个配置文件链接到sites-enabled文件夹下
root@18cc785cc795:/var/www/html# ln -s /etc/apache2/sites-available/default-ssl.conf /etc/apache2/sites-enabled/001-ssl.conf
ln: failed to create symbolic link '/etc/apache2/sites-enabled/001-ssl.conf': File exists
root@18cc785cc795:/var/www/html#
因为我已经创建过了,所以这里是失败的。如果没有该文件,那么首次创建就会显示成功。
然后我们重载配置文件并重启apache服务:
root@18cc785cc795:/var/www/html# service apache2 reload
Reloading Apache httpd web server: apache2.
root@18cc785cc795:/var/www/html# service apache2 restart
Restarting Apache httpd web server: apache2Terminated
root@18cc785cc795:/var/www/html# # [root@fangjunyu]/var/www/html# docker ps
CONTAINER ID IMAGE COMMAND CREATED STATUS PORTS NAMES
18cc785cc795 wordpress:latest "docker-entrypoint.s…" 10 hours ago Up 4 seconds 0.0.0.0:8000->80/tcp, :::8000->80/tcp, 0.0.0.0:8001->443/tcp, :::8001->443/tcp docker-wordpress-1
[root@fangjunyu]/var/www/html#
服务重启后,我们重新回到WordPress容器来验证一下端口的监听状态
[root@fangjunyu]/var/www/html# docker exec -it 18cc785cc795 bash
root@18cc785cc795:/var/www/html# netstat -an
Active Internet connections (servers and established)
Proto Recv-Q Send-Q Local Address Foreign Address State
tcp 0 0 0.0.0.0:80 0.0.0.0:* LISTEN
tcp 0 0 127.0.0.11:36145 0.0.0.0:* LISTEN
tcp 0 0 0.0.0.0:443 0.0.0.0:* LISTEN
udp 0 0 127.0.0.11:43338 0.0.0.0:*
Active UNIX domain sockets (servers and established)
Proto RefCnt Flags Type State I-Node Path
root@18cc785cc795:/var/www/html#
只要有0.0.0.0:80和0.0.0.0:443,说明上述的配置都已经修改完成。
WordPress配置文件
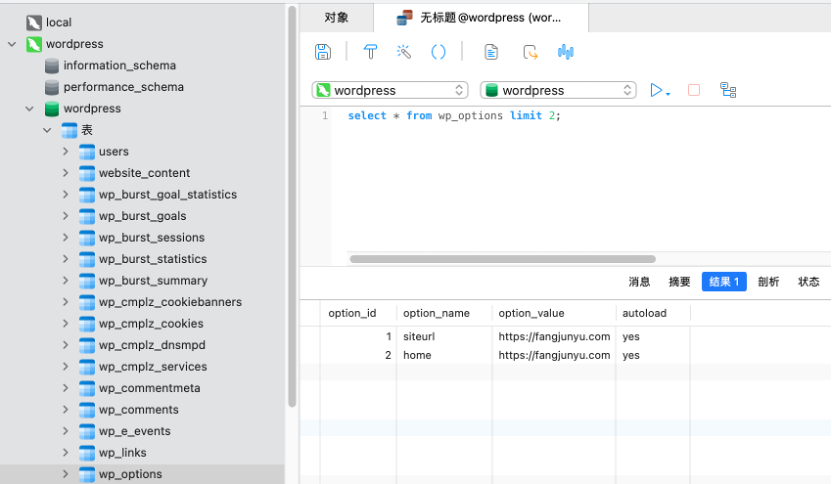
我们先用数据库链接工具,通过WordPress绑定的数据库账号进行连接,测试数据库配置是否存在异常,也方便我们下面的数据更改。
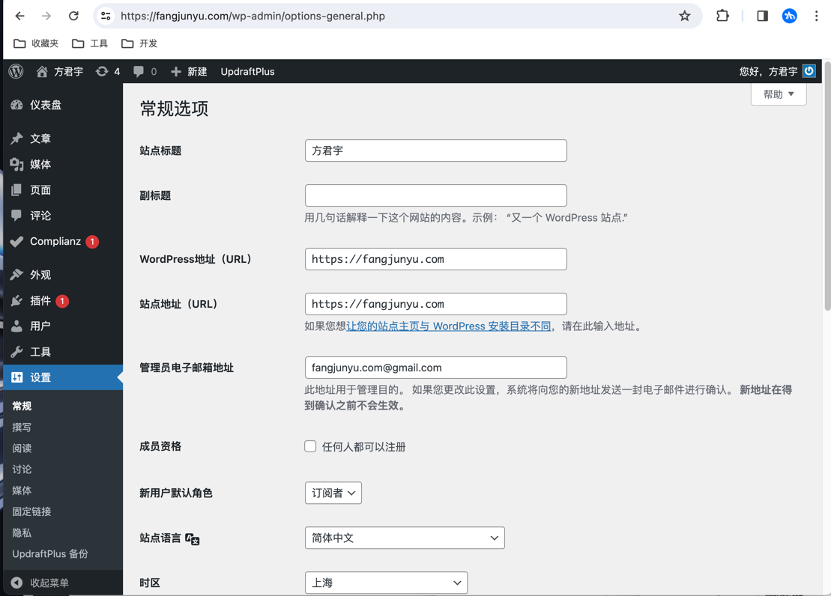
然后到WordPress后台,https://fangjunyu.com/admin,修改设置-常规中的URL配置
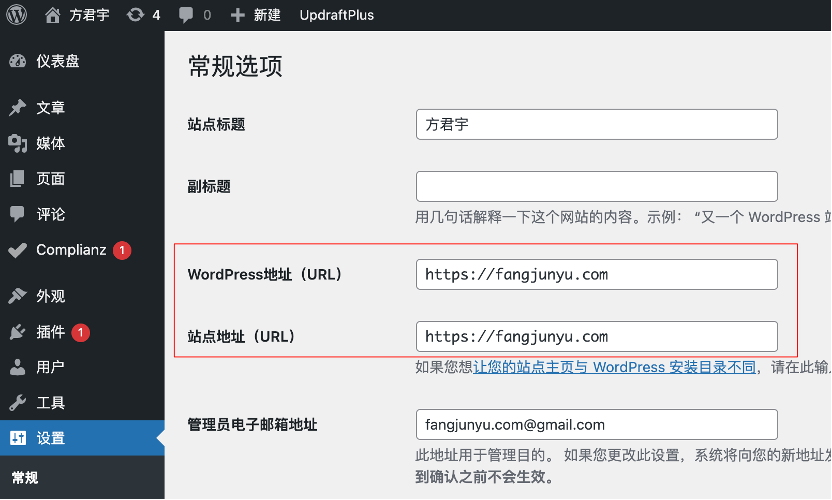
修改后,前台就会出现无法访问的情况,不要怕,我们要走的路是很崎岖不平的,正因为如此,我们才要勇敢的坚持下去。
如果这时想要改回去,我们可以在数据库管理工具中输入
select * from wp_options limit 2;前两行数据对应的就是系统中的两个URL,再改回http就行,这里先告诉大家退路。
然后我们要开始修改数据库的文件协议,这里一定要先备份数据库,以免出现差错时,进行数据还原。任何修改文件、数据库等操作都要备份,操作不规范,自己两行泪。
UPDATE wp_posts SET post_content = REPLACE(post_content, 'https://fangjunyu.com','https://fangjunyu.com');
UPDATE wp_comments SET comment_content = REPLACE(comment_content, 'https://fangjunyu.com','https://fangjunyu.com');
UPDATE wp_comments SET comment_author_url = REPLACE(comment_author_url, 'https://fangjunyu.com','https://fangjunyu.com');
UPDATE wp_postmeta SET meta_value = REPLACE(meta_value, 'https://fangjunyu.com','https://fangjunyu.com');
UPDATE wp_termmeta SET meta_value = REPLACE(meta_value, 'https://fangjunyu.com','https://fangjunyu.com');
语句为将WordPress地址和站点地址改为https协议。
我们再次重新回到WordPress容器,并修改wp-admin/theme-editor.php文件,添加两个add_filter语句,
[root@fangjunyu]~# docker exec -it 18cc785cc795 bash
root@18cc785cc795:/var/www/html# cat wp-admin/theme-
theme-editor.php theme-editor.php20240310 theme-install.php
root@18cc785cc795:/var/www/html# cat wp-admin/theme-editor.php
 RewriteEngine On
# RewriteRule .* - [E=HTTP_AUTHORIZATION:%{HTTP:Authorization}]
RewriteBase /
RewriteRule ^index\.php$ - [L]
RewriteCond %{REQUEST_FILENAME} !-f
RewriteCond %{REQUEST_FILENAME} !-d
RewriteRule . /index.php [L]
# END WordPress
root@18cc785cc795:/var/www/html# cat wp-config.php
...
$_SERVER['HTTP_HOST'] = $_SERVER['HTTP_X_FORWARDED_HOST'];
root@18cc785cc795:/var/www/html#其中wp-config.php是在文件的最底部添加这个语句,添加后,好像HTTPS页面就可以正常访问了。
强制HTTPS访问
我们接下来继续深入操作,我们在WordPress容器中,执行apache重定向模块
[root@fangjunyu]~# docker exec -it 18cc785cc795 bash
root@18cc785cc795:/var/www/html# a2enmod rewrite
Module rewrite already enabled
root@18cc785cc795:/var/www/html#
执行 a2enmod rewrite 后,显示 enabled 表示已启用。
然后,我们再修改000-default.conf配置文件,实现301重定向,修改前记得要备份原文件。
root@18cc785cc795:/var/www/html# cd /etc/apache2/sites-available/
root@18cc785cc795:/etc/apache2/sites-available# ls
000-default.conf 000-default.conf20240310 default-ssl.conf
root@18cc785cc795:/etc/apache2/sites-available# cat 000-default.conf

# The ServerName directive sets the request scheme, hostname and port that
# the server uses to identify itself. This is used when creating
# redirection URLs. In the context of virtual hosts, the ServerName
# specifies what hostname must appear in the request's Host: header to
# match this virtual host. For the default virtual host (this file) this
# value is not decisive as it is used as a last resort host regardless.
# However, you must set it for any further virtual host explicitly.
#ServerName www.example.com
RewriteEngine on
RewriteCond %{HTTPS} !=on
RewriteRule ^(.*) https://%{SERVER_NAME}$1 [L,R=301]
...
修改内容为3个Rewrite语句。
修改配置文件后,再重启apache服务。
root@18cc785cc795:/var/www/html# service apache2 reload
Reloading Apache httpd web server: apache2.
root@18cc785cc795:/var/www/html# service apache2 restart
Restarting Apache httpd web server: apache2Terminated
root@18cc785cc795:/var/www/html# #
我们把WordPress容器和WordPress配置完成后,我们再到Nginx中配置端口。
[root@fangjunyu]~# cat /etc/nginx/nginx.conf
...
http {
...
server {
listen 80;
listen [::]:80;
server_name fangjunyu.com www.fangjunyu.com;

location / {
# add_header 'Access-Control-Allow-Origin' 'https://fangjunyu.com' always;
add_header 'Access-Control-Allow-Origin' '*' always;
add_header 'Access-Control-Allow-Credentials' 'true' always;
add_header 'Access-Control-Allow-Headers' 'Authorization,Content-Type,Accept,Origin,User-Agent,DNT,Cache-Control,X-Mx-ReqToken,X-Requested-With' always;
add_header 'Access-Control-Allow-Methods' 'GET,POST,OPTIONS' always;
# 这里的端口号是您 WordPress 服务器的端口号
proxy_pass https://fangjunyu.com:8000;
# 配置是否向被转发的端口传递客户端的真实IP
proxy_set_header X-Real-IP $remote_addr;
# 配置是否向被转发的端口传递代理IP链路
proxy_set_header X-Forwarded-For $proxy_add_x_forwarded_for;
# 配置是否向被转发的端口传递http代理IP链路
proxy_set_header HTTP_X_FORWARDED_FOR $remote_addr;
# 配置链接重定向方式,跟随端口的response
proxy_redirect default;
# 配置nginx使用的http协议版本
proxy_http_version 1.1;
# 最后两条配置是否允许使用websocket
proxy_set_header Upgrade $http_upgrade;
proxy_set_header Connection "upgrade";
# proxy_set_header Host $host;
# proxy_cache_bypass $http_upgrade;
}
...
}

# Settings for a TLS enabled server.
#
server {
listen 443 ssl http2;
listen [::]:443 ssl http2;
server_name _;
# root /opt/node/app/fangjunyu.com/index.html;

ssl_certificate "/etc/nginx/fangjunyu.com_nginx/fangjunyu.com_bundle.crt";
ssl_certificate_key "/etc/nginx/fangjunyu.com_nginx/fangjunyu.com.key";
ssl_session_cache shared:SSL:1m;
ssl_session_timeout 10m;
ssl_ciphers HIGH:!aNULL:!MD5;
ssl_prefer_server_ciphers on;

location / {
# add_header 'Access-Control-Allow-Origin' 'https://fangjunyu.com' always;
add_header 'Access-Control-Allow-Origin' '*' always;
add_header 'Access-Control-Allow-Credentials' 'true' always;
add_header 'Access-Control-Allow-Headers' 'Authorization,Content-Type,Accept,Origin,User-Agent,DNT,Cache-Control,X-Mx-ReqToken,X-Requested-With' always;
add_header 'Access-Control-Allow-Methods' 'GET,POST,OPTIONS' always;
# proxy_pass http://localhost:8000; # 这里的端口号是您 Node.js 服务器的端口号
# proxy_http_version 1.1;
# proxy_set_header Upgrade $http_upgrade;
# proxy_set_header Connection 'upgrade';
# proxy_set_header Host $host;
# proxy_cache_bypass $http_upgrade;
# 这里的端口号是您 WordPress 服务器的端口号
proxy_pass https://fangjunyu.com:8001;
# 配置是否向被转发的端口传递客户端的真实IP
proxy_set_header X-Real-IP $remote_addr;
# 配置是否向被转发的端口传递代理IP链路
proxy_set_header X-Forwarded-For $proxy_add_x_forwarded_for;
# 配置是否向被转发的端口传递http代理IP链路
proxy_set_header HTTP_X_FORWARDED_FOR $remote_addr;
# 配置链接重定向方式,跟随端口的response
proxy_redirect default;
# 配置nginx使用的http协议版本
proxy_http_version 1.1;
# 最后两条配置是否允许使用websocket
proxy_set_header Upgrade $http_upgrade;
proxy_set_header Connection "upgrade";
# proxy_set_header Host $host;
# proxy_cache_bypass $http_upgrade;
}
...
}
}
这里需要注意的是,proxy_pass 需要为服务器地址(服务ip好像也行)+端口,但是不要用localhost:8000和localhost:8001,因为如果用localhost的话,就会导致你的网页一直会被重定向到localhost!!!
HTTPS设置完成
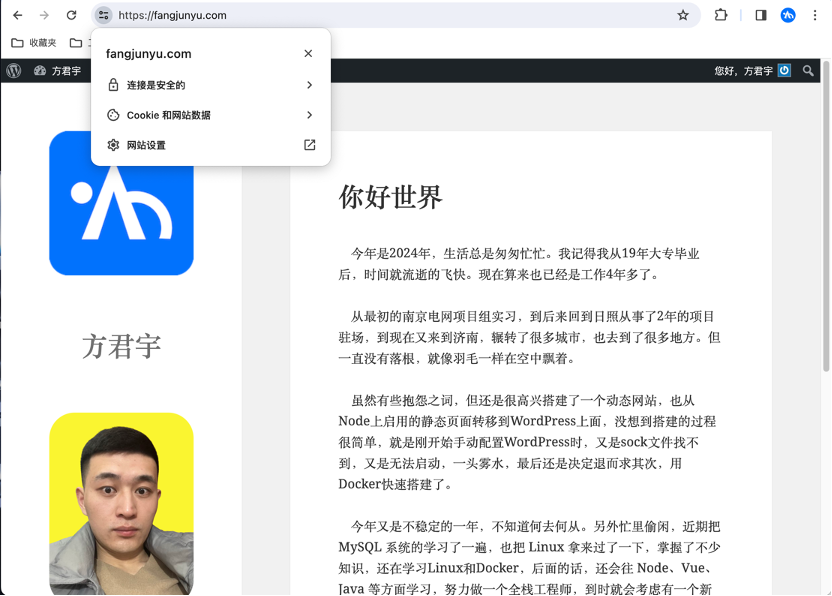
最后,大功告成,贴一张完成的效果图。
踩坑经历
1)HTTPS修改后,存在样式和图片丢失的问题:
在修改数据库的https协议后,存在这个问题,因此需要进一步配置WrodPress,本文所提到的相关的配置文件都要修改,修改后重启apache服务和WordPress容器。
2)HTTPS修改后,后台可以登录,但是点击主题页不显示。
这里的问题在于你在常规设置中,WordPress地址(URL)加了端口导致的,加端口号后,主题等服务会提示无法连接,必须要把端口去掉。
如果说去掉端口后,后台都无法登录了,就是配置文件没有修改后,重新去修改配置文件。
3)访问网站存在重定向到localhost的问题
这个问题在上面已经描述过了,要在nginx中,把配置监听的80端口和443端口的proxy_pass改成网站域名+端口,不要用localhost+端口作为地址。
4)完成上述问题后,仍然存在个别图片或内容显示失败
这里就要去外观的主题文件编辑器或者主题中,查看这个图片或内容是不是http协议的,这个文件的地址可能是你手动录入维护的,因为在修改数据库的过程中,没有修改到你的这个问题。
5)WordPress容器修改配置文件后,服务一直重启
这个问题目前无解,比如我在修改WordPress容器的SSL配置文件时,忘记是文件地址错误还是少传了一个配置文件,导致WordPress容器一直在重启,最后只能删除掉这个容器,重新启动一个新的容器。
启动新的容器,就会存在之前的配置文件丢失等情况,因为不要随便修改容器的配置文件或配置成错误的信息。
参考资料
1)Wordpress开启全站Https访问:https://www.xjimmy.com/wordpress_https.html
2)在代理中访问由 apache 和 nginx 托管的 wordpress 时重定向到 127.0.0.1:https://devpress.csdn.net/cloud/6304f1e1c67703293080e778.html
3)Docker + WordPress + HTTPS部署教程:https://zhuanlan.zhihu.com/p/514684587
感谢上面的各位的知识分享


非常可以